
BranchCAD user guide
Everything you can do in BranchCAD, chapter by chapter. Chapters 1 to 5 get you drawing in a few minutes; the rest is reference.
LINE; their short aliases follow in brackets, e.g. LINE (L). Keys are shown as Enter. A step-by-step procedure is a numbered list. Every command is also listed on the separate BranchCAD Command Cheat Sheet.Introduction
Chapter 1: Welcome to BranchCAD
BranchCAD is a professional 2D CAD application that runs entirely in your web browser. There is nothing to install: sign in, open a model and start drawing — with the AutoCAD-style commands you already know.

Who this guide is for
Anyone who draws with BranchCAD — from first-time users to experienced AutoCAD drafters. Chapters 2–5 get you productive in a few minutes; the later chapters are a reference for each area of the program. If you already know AutoCAD, read Chapter 4 and keep the cheat sheet beside you: almost every familiar alias works the same way.
The sample drawing
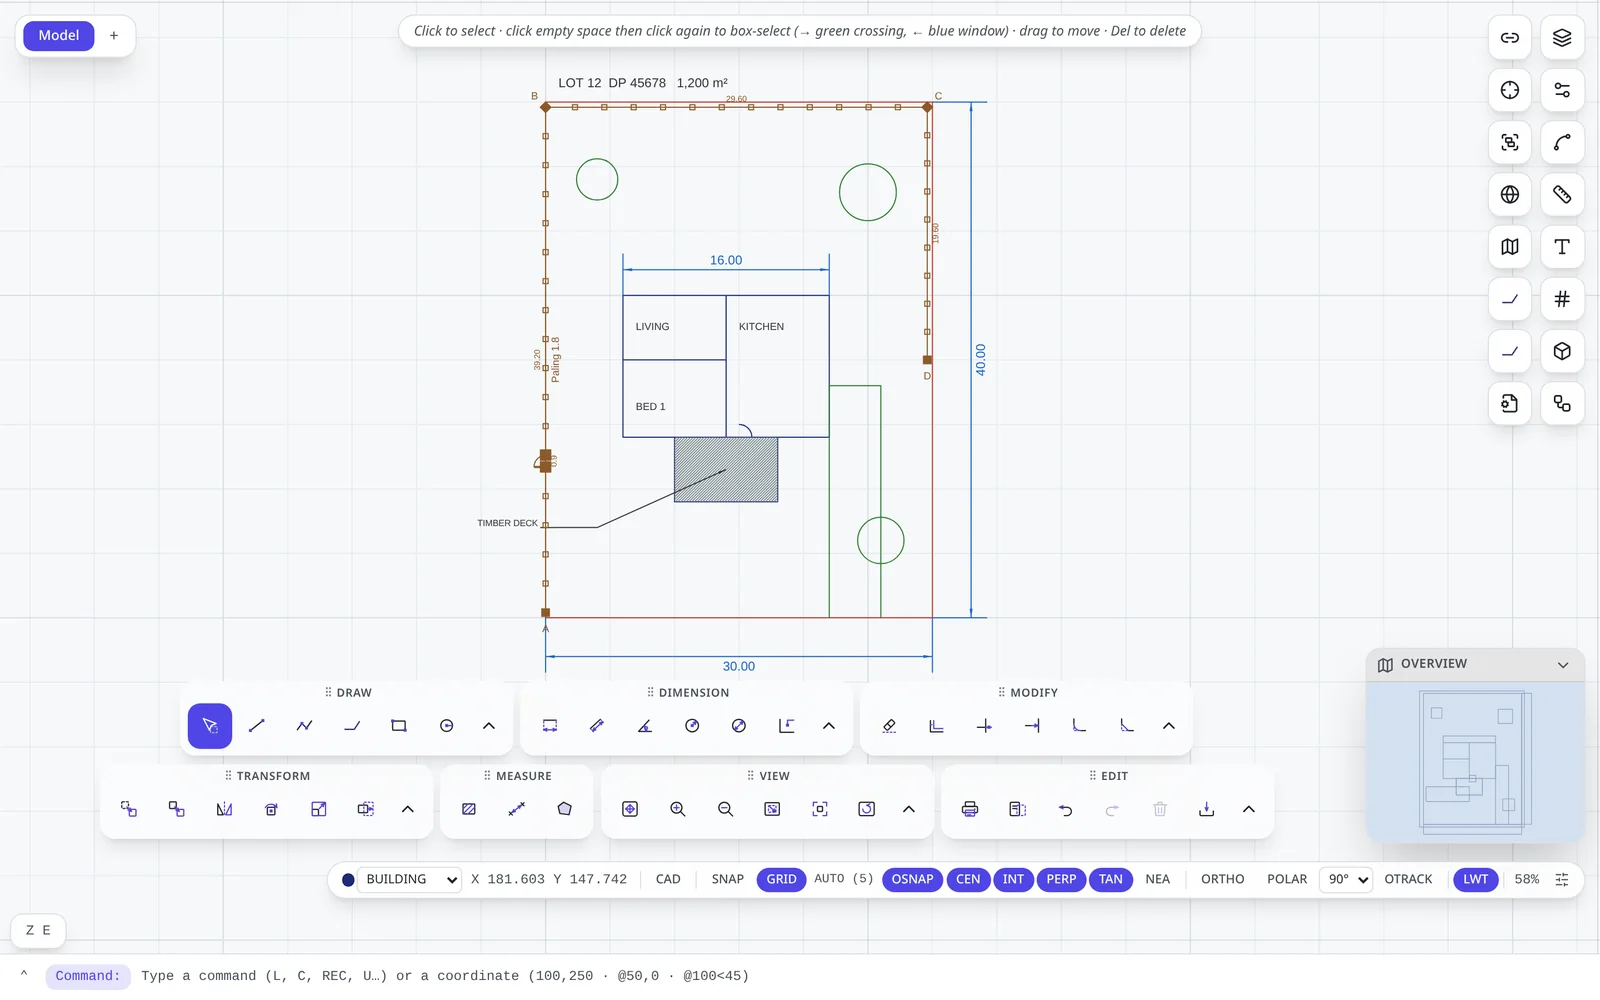
The screenshots in this guide use a single example: Lot 12, a 30 × 40 m residential section with a 16 × 11 m house, a timber deck, a driveway, trees, dimensions, notes and a 1.8 m timber paling boundary fence with a pedestrian gate. You can reproduce every step on your own drawing.
First steps
Chapter 2: Getting started
Create your account
- Open BranchCAD in a current version of Chrome, Edge, Firefox or Safari.
- Choose Register and enter your name, e-mail and a password — or sign in with Google.
- Confirm your e-mail address from the verification message we send you.
- Pick a plan. Free is enough to learn everything in this guide; you can upgrade at any time.
After you sign in, BranchCAD opens straight into the editor: your last-opened model, otherwise the most recently changed one, otherwise a fresh model called Untitled.
Your models
In BranchCAD a drawing is called a model. Open Browse all models to see the Your models page, which lists your active and archived models and shows your plan usage.
| To… | Do this |
|---|---|
| Create a model | Type a name into New model name and click Create. It opens in the editor. |
| Open a model | Click its name. |
| Rename | Click Rename, type the new name, press Enter (or Save). In the editor you can also click the name in the top bar. |
| Archive / Unarchive | Archive moves a model to the Archived list — it stays readable but read-only. Unarchive brings it back. |
| Delete | Click Delete and confirm with Yes, delete. This cannot be undone. |
| Plan limit reached | On Free, choose Archive & create to make room without deleting anything. |
Saving is automatic
There is no Save button. Every change is saved as you work, and the status indicator in the top bar tells you where things stand: Saving…, Saved, Reconnecting… or Offline · saved on this device. If you lose your connection, keep drawing — the changes are kept locally and sent when you are back online. To mark a milestone, name a version (see Chapter 20).
Your first drawing in two minutes
- Click in the command line at the bottom of the screen, type
RECand press Enter. - Type
0,0Enter for the first corner, then@30,40Enter for the opposite corner. You have drawn a 30 × 40 boundary. - Type
Z EEnter to zoom to everything you have drawn. - Type
OEnter, then3Enter, click the rectangle and click inside it: a 3 m set-back line appears. - Type
DLIEnter, click two corners of the boundary and click where the dimension line should sit.
Press Esc at any time to cancel the current command, and Ctrl+Z to undo the last change.
Orientation
Chapter 3: A tour of the workspace
The editor is a full-screen drawing canvas with floating tools around its edges. Everything floats, so the drawing always gets the most space.
Tool groups
The floating tool groups at the bottom hold the most-used tools. Hover any button to see its name and command. The ˄ arrow at the end of a group expands it to show the less common tools. Drag a group by its ⠿ handle to move it anywhere on screen; it snaps neatly to the edges and to other groups. You can restore the default arrangement from Settings → Editor defaults → Toolbar layout → Reset to default.
| Group | Contains |
|---|---|
| Draw | Select, line, polyline, fence, rectangle, circle — expanded: arc, ellipse, spline, polygon, point, ray, construction line, revision cloud, text, multiline text, table. |
| Dimension | Linear, aligned, angular, radius, diameter, ordinate — expanded: arc length, continue, baseline, leader. |
| Modify | Erase, offset, trim, extend, fillet, chamfer — expanded: break, join, lengthen. |
| Transform | Move, copy, mirror, rotate, scale, stretch — expanded: align, array, edit polyline, divide, measure. |
| Measure | Hatch, distance, area. |
| View | Zoom and pan controls, including zoom window and zoom extents. |
| Edit | Plot, page setup, undo, redo, delete selection, export. |
The panel rail
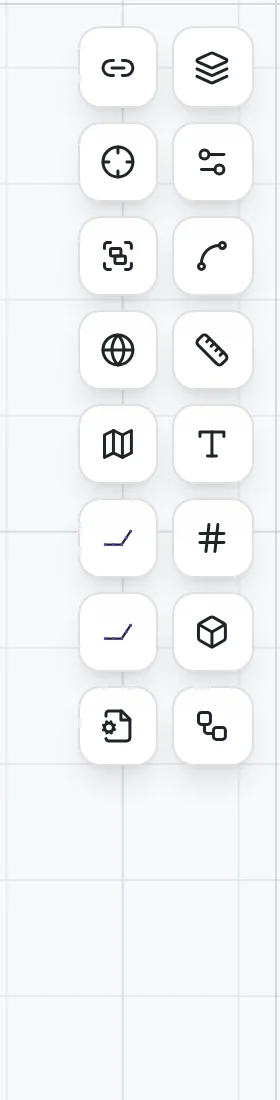
The column of round buttons on the right opens the side panels. Panels are floating cards: drag them by their header, close them with ×. The same panels open from the command line (for example LA for Layers).
- Share link and Layers
- Object snap settings and Properties
- Groups and Linetypes
- Georeference and Dimension styles
- GIS / map and Text styles
- Fences and Fence elevation
- Grid, Blocks, Import, External references
The Properties panel also opens by itself whenever you select something (you can switch that off with its Auto-open box).
The status bar
Highlighted (filled) buttons are on; click any of them to toggle.
| Item | Meaning |
|---|---|
| Layer list | The current layer — new objects are drawn on it. |
| X / Y | Live cursor coordinates. When the drawing is georeferenced they show grid E/N. |
| CAD / MAP | The current environment (see Chapter 17). |
| SNAP · GRID | Grid snap and grid display. AUTO (5) shows the grid spacing. |
| OSNAP · CEN INT PERP TAN NEA | Object snap on/off and the individual snap modes. |
| ORTHO · POLAR 90° · OTRACK | Ortho lock, polar tracking (with its angle) and object-snap tracking. |
| LWT | Display lineweights on screen. |
| 58% · ☰ | Zoom level and display settings. |
The heart of BranchCAD
Chapter 4: Commands & coordinates
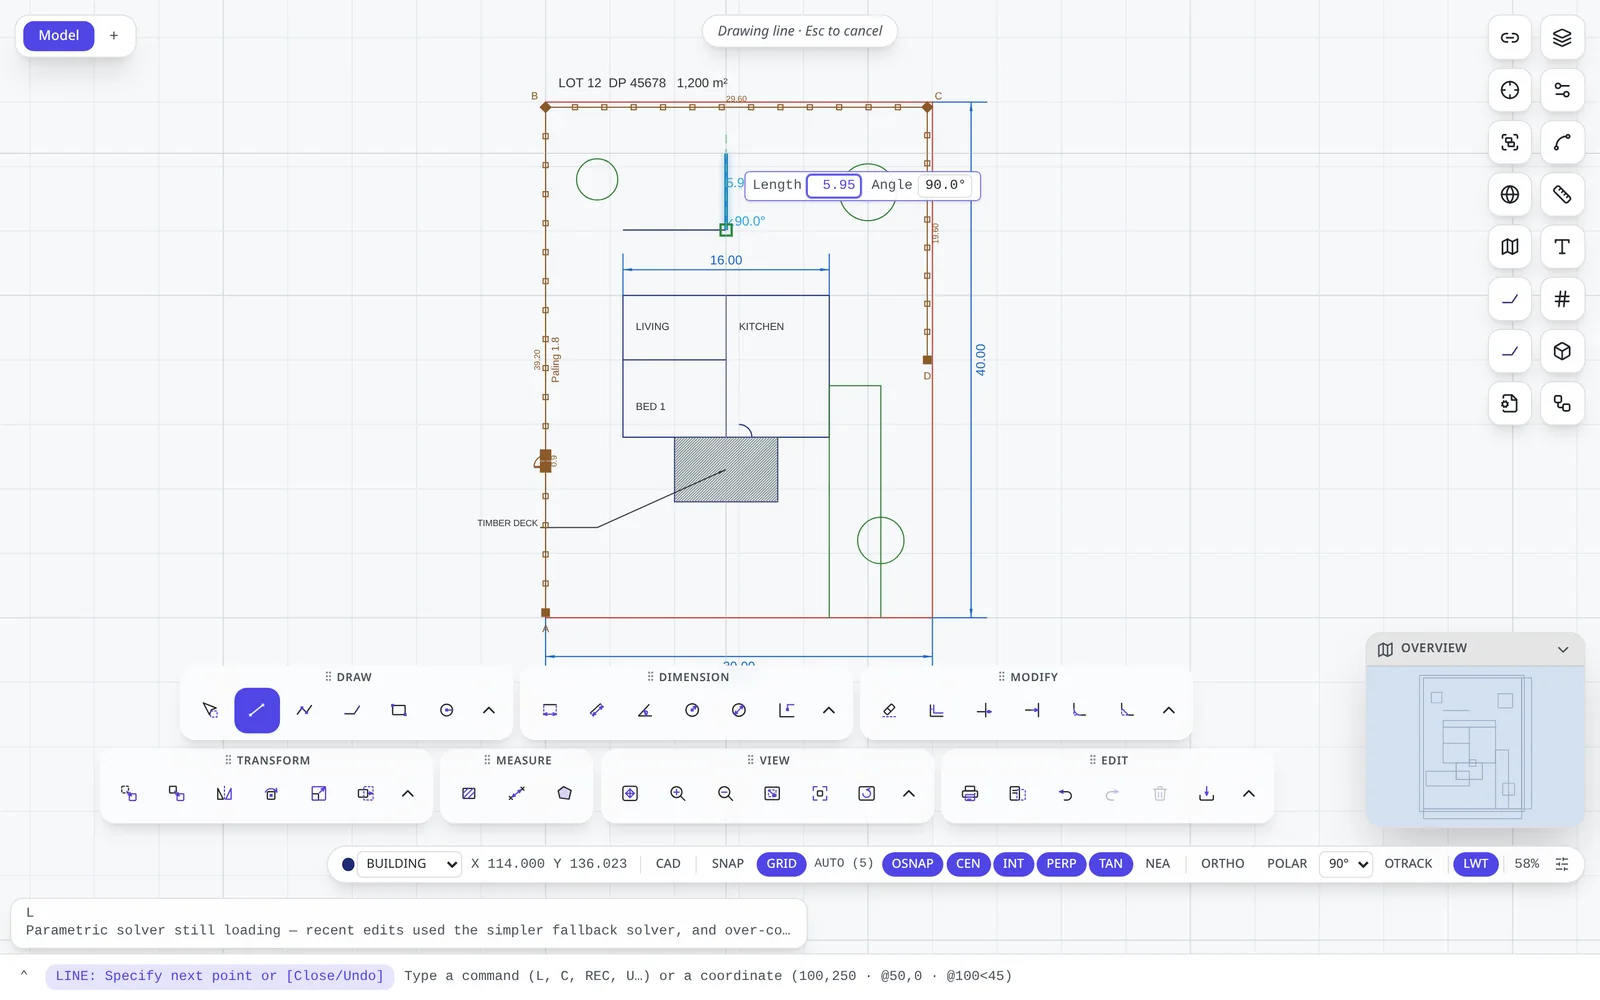
Everything in BranchCAD can be done from the command line. Clicking a toolbar button and typing its command do exactly the same thing — use whichever is faster for you.
Running a command
- Type the command or its alias —
LINEor justL— and press Enter. Commands are not case-sensitive. - Read the prompt on the left of the command line, e.g. LINE: Specify next point or [Close/Undo]. Words in brackets are options; type the capital letter (
C,U) to use one. - Answer by clicking in the drawing or typing a value or coordinate, and press Enter.
- Press Enter on an empty line (or right-click) to finish. Press Enter again to repeat the last command. Esc cancels.
Typing coordinates
Wherever a command asks for a point you can type it instead of clicking. Angles are in degrees, measured counter-clockwise from the positive X axis (east = 0°, north = 90°).
| Form | Example | Meaning |
|---|---|---|
x,y | 100,250 | Absolute point, measured from the origin. |
@dx,dy | @50,0 | Relative — 50 to the right of the last point. |
d<a | 25<30 | Absolute polar — 25 from the origin at 30°. |
@d<a | @100<45 | Relative polar — 100 from the last point at 45°. |
Ge,n | G1752340.885,5428110.223 | A real-world grid coordinate (easting, northing). Needs a georeference (Ch. 17). |
| a number | 12.5 | Direct distance — point the cursor in a direction and type a length. |
Options that work inside commands
| Type | In | Effect |
|---|---|---|
U | any point-by-point command | Undo the last point (LINE removes the last segment). |
C | LINE, PLINE, SPLINE, FENCE, AREA, REVCLOUD | Close the shape back to its start. |
D | CIRCLE | Enter a diameter instead of a radius. |
I / C | POLYGON | Inscribed in / circumscribed about a circle. |
S / R | INSERT | Scale / rotate the block you are placing. |
DE P T DY | LENGTHEN | Delta, Percent, Total, Dynamic. |
C O J W F S D R | PEDIT | Close, Open, Join, Width, Fit, Spline, Decurve, Reverse. |
While a command is waiting for one of its options, those letters belong to the command — typing C at a POLYGON prompt chooses Circumscribed and does not start the CIRCLE command.
Commands that act on a selection
Many commands work noun-first: select the objects, then type the command. GROUP, UNGROUP, EXPLODE, ERASE, REGION, UNION, SUBTRACT, INTERSECT, LAYISO and FENCEAPPLY all act on whatever is selected. Modify commands such as MOVE and ROTATE use the current selection if there is one, and ask you to select otherwise.
Moving around
Chapter 5: Navigating the drawing
| Action | How |
|---|---|
| Zoom in / out | Roll the mouse wheel — zooming centres on the cursor. Or press + / −, or type Z I / Z OUT. |
| Pan | Hold Space and drag, use the Pan tool (P), or nudge with the arrow keys. |
| See everything | Z E (or ZE, Z A, bare Z) — zoom extents. |
| Zoom to an area | Z W then drag a box. |
| Zoom to the selection | Select, then Z O. |
| Go back | Z P — the previous view. |
| Realtime zoom | Z R then drag up / down. |
| Jump with the overview | Drag the frame in the Overview minimap; collapse it with its arrow. |
Saved views
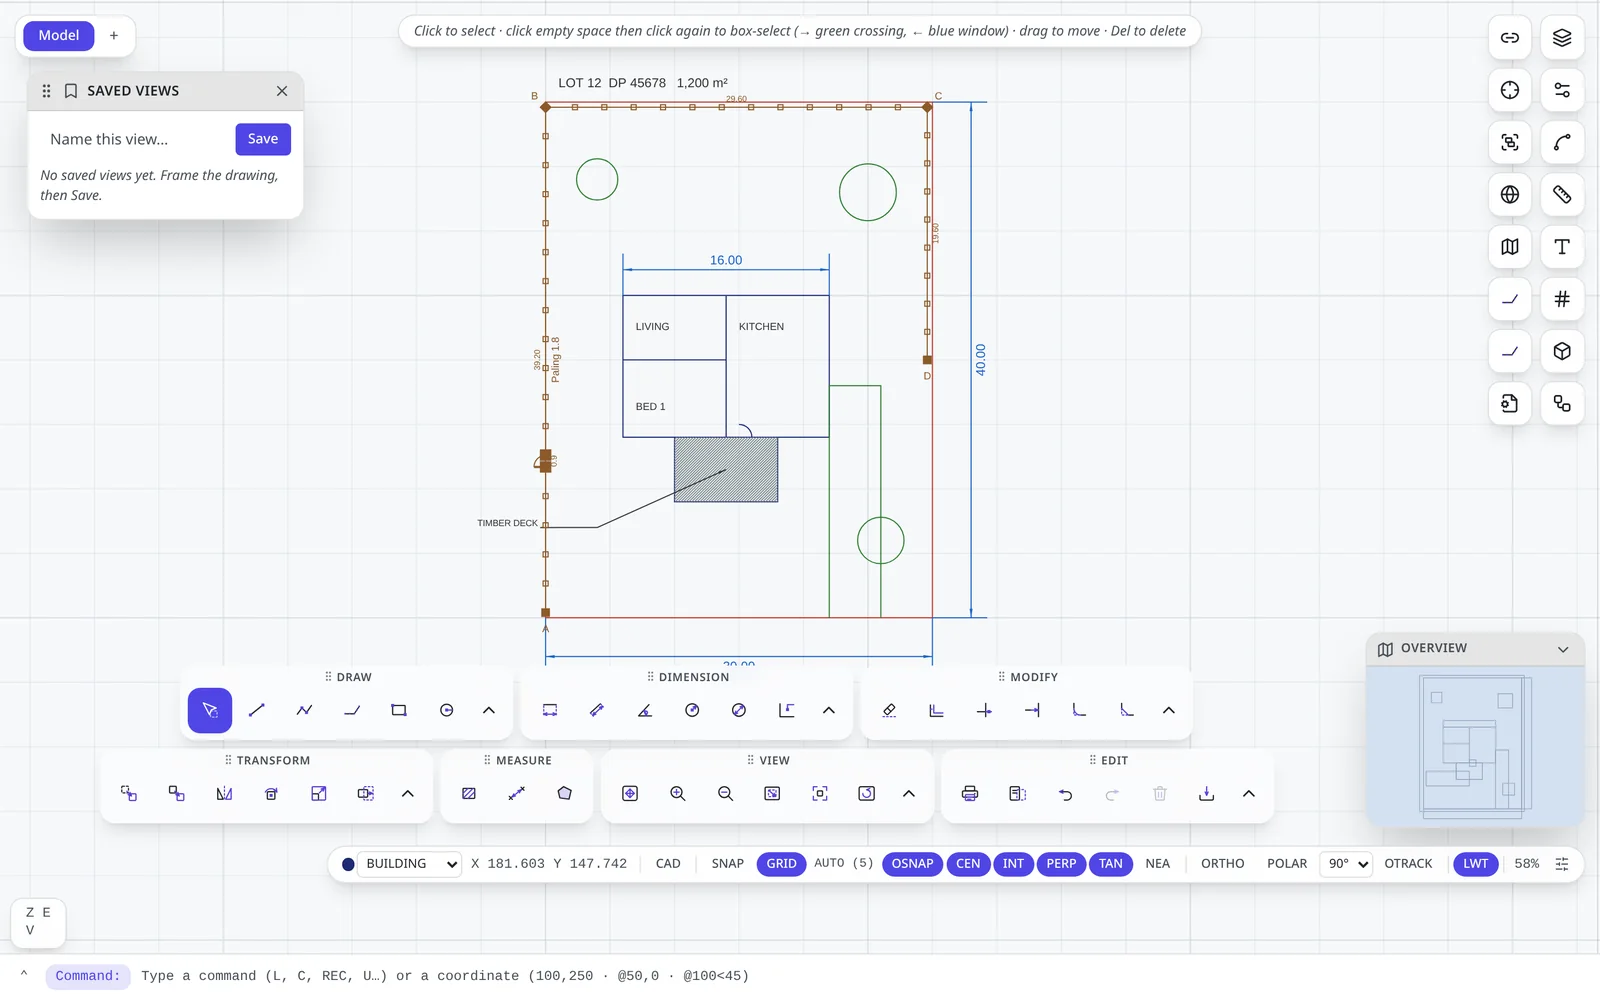
Type V (or VIEW) to open Saved views. Frame the part of the drawing you want, type a name such as Front yard and click Save. Click a saved view later to jump straight back to it. Saved views are stored with the drawing, so collaborators see them too.
NAV opens the navigation settings, where you can adjust mouse-wheel behaviour and turn smooth zoom animation on or off.
Creating geometry
Chapter 6: Drawing objects
Every drawing tool follows the same rhythm: start the command, give it points (by clicking or typing), and finish with Enter. New objects go on the current layer shown on the status bar.
| Command | Aliases | How to use it |
|---|---|---|
| LINE | L | Click a start point, then each next point. Each segment is a separate line. C closes, U undoes a segment. |
| PLINE | PL | Like LINE, but all segments form one polyline object. C makes it closed. |
| RECTANG | REC | Two opposite corners. Use @w,h for the second corner to give exact width and height. |
| CIRCLE | C | Centre, then radius (or D then diameter). |
| ARC | A | Start point, a point on the arc, end point. |
| ELLIPSE / ELLIPSEARC | EL / EA | Centre and the two axis ends; the arc form also asks for start and end angles. |
| SPLINE / SPLINEFIT | SPL / SPF | A smooth curve by control vertices, or one that passes through every point you click. |
| POLYGON | POL | Number of sides, centre, I or C, then radius. |
| POINT | PO | Place point markers. DDPTYPE chooses the marker style and size. |
| RAY / XLINE | RAY / XL | Construction lines infinite in one or both directions. |
| REVCLOUD | RC | Click around an area to mark a revision; C closes the cloud. |
| TEXT, MTEXT, TABLE | T, MT, TB | See Chapter 11. |
| FENCE | FN | See Chapter 18. |
Example — a house outline with internal walls
- Choose the BUILDING layer from the status bar.
RECEnter6,14Enter@16,11Enter — the outside of the house.LEnter14,14Enter@0,11Enter Enter — a wall between bedroom and kitchen.LEnter6,20Enter@8,0Enter Enter — the living-room wall.AEnter and click three points to draw a door swing.
Accuracy
Chapter 7: Drafting precision
Object snaps
With OSNAP on, the cursor locks onto exact points of existing objects. A marker and a tooltip show what it found — for example Endpoint · 8.38 < −162.6° — before you click.
| Snap | Finds |
|---|---|
| Endpoint | The ends of lines, arcs and polyline segments. |
| Midpoint | The middle of a segment. |
| Center (CEN) | The centre of a circle, arc or ellipse. |
| Quadrant | The 0°, 90°, 180° and 270° points of a circle. |
| Intersection (INT) | Where two objects cross. |
| Perpendicular (PERP) | The point at right angles from your last point. |
| Tangent (TAN) | A tangent point on a curve. |
| Nearest (NEA) | The closest point on any object. |
| Extension · Parallel | Points along a line's extension, or parallel to a segment you hover. |
Turn individual snap modes on or off on the status bar. The crosshair button on the panel rail opens the full object-snap settings.
Grid and snap
| Command | Effect |
|---|---|
GRID or F7 | Show / hide the grid. |
GRID 5 | Draw grid lines every 5 units. |
GRID A | Automatic spacing that adapts to the zoom level (AUTO on the status bar). |
SNAP or F9 | Toggle snapping the cursor to the grid. |
SNAP 0.5 | Cursor moves in steps of 0.5. |
GRID LOCK ON/OFF | Whether setting a grid spacing also sets the snap step. |
Ortho, polar and tracking
- ORTHO (F8) — the cursor moves only horizontally or vertically from the last point.
- POLAR (F10) — the cursor locks to multiples of the polar angle shown on the status bar (e.g. 90°, 45°, 30°). Choose the angle from the list beside it.
- OTRACK (F11) — object-snap tracking: hover a snap point, move away, and the cursor tracks along alignment lines from it.
L, click a start point, move the cursor to the right and type 12 Enter; move it up and type 4.5 Enter. You have drawn a 12 × 4.5 corner.Choosing what to change
Chapter 8: Selecting & the Properties panel
Ways to select
| Action | Result |
|---|---|
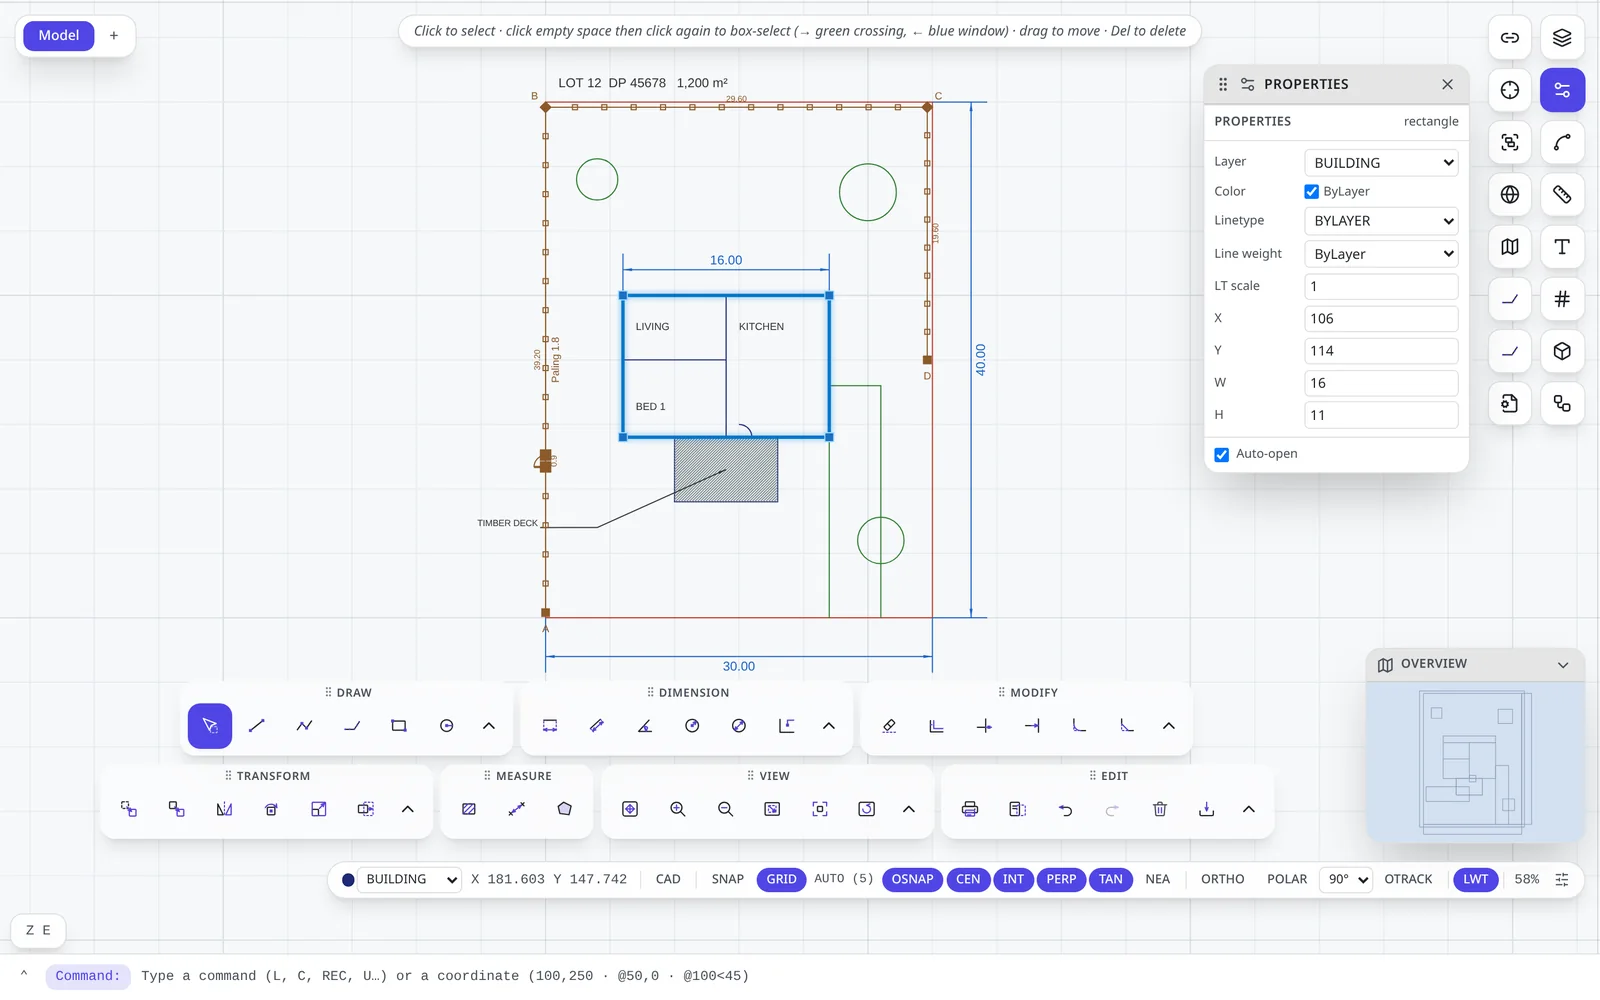
| Click an object | Selects it; the Properties panel opens. |
| Click more objects | Adds them to the selection. |
| Click empty space, then click again to the right | Green crossing box — selects everything the box touches. |
| Click empty space, then click again to the left | Blue window box — selects only what is fully inside. |
| Ctrl+A | Select all. |
| Esc, Ctrl+D | Clear the selection. |
| Drag a selected object | Moves it. |
| Del | Erases the selection. |
The Properties panel
Every object type has its own properties. Change a value and press Enter (or click away) and the drawing updates at once. Common to all objects: Layer, Color (tick ByLayer to follow the layer), Linetype, Line weight and LT scale. Below that are the geometry fields — for example X, Y, W, H for a rectangle, centre and radius for a circle, and a vertex table (with insert and delete) for polylines, splines and revision clouds. Text, tables, dimensions, hatches and fences have the richest sections. When several objects are selected, the panel edits the values they share.
Quick select
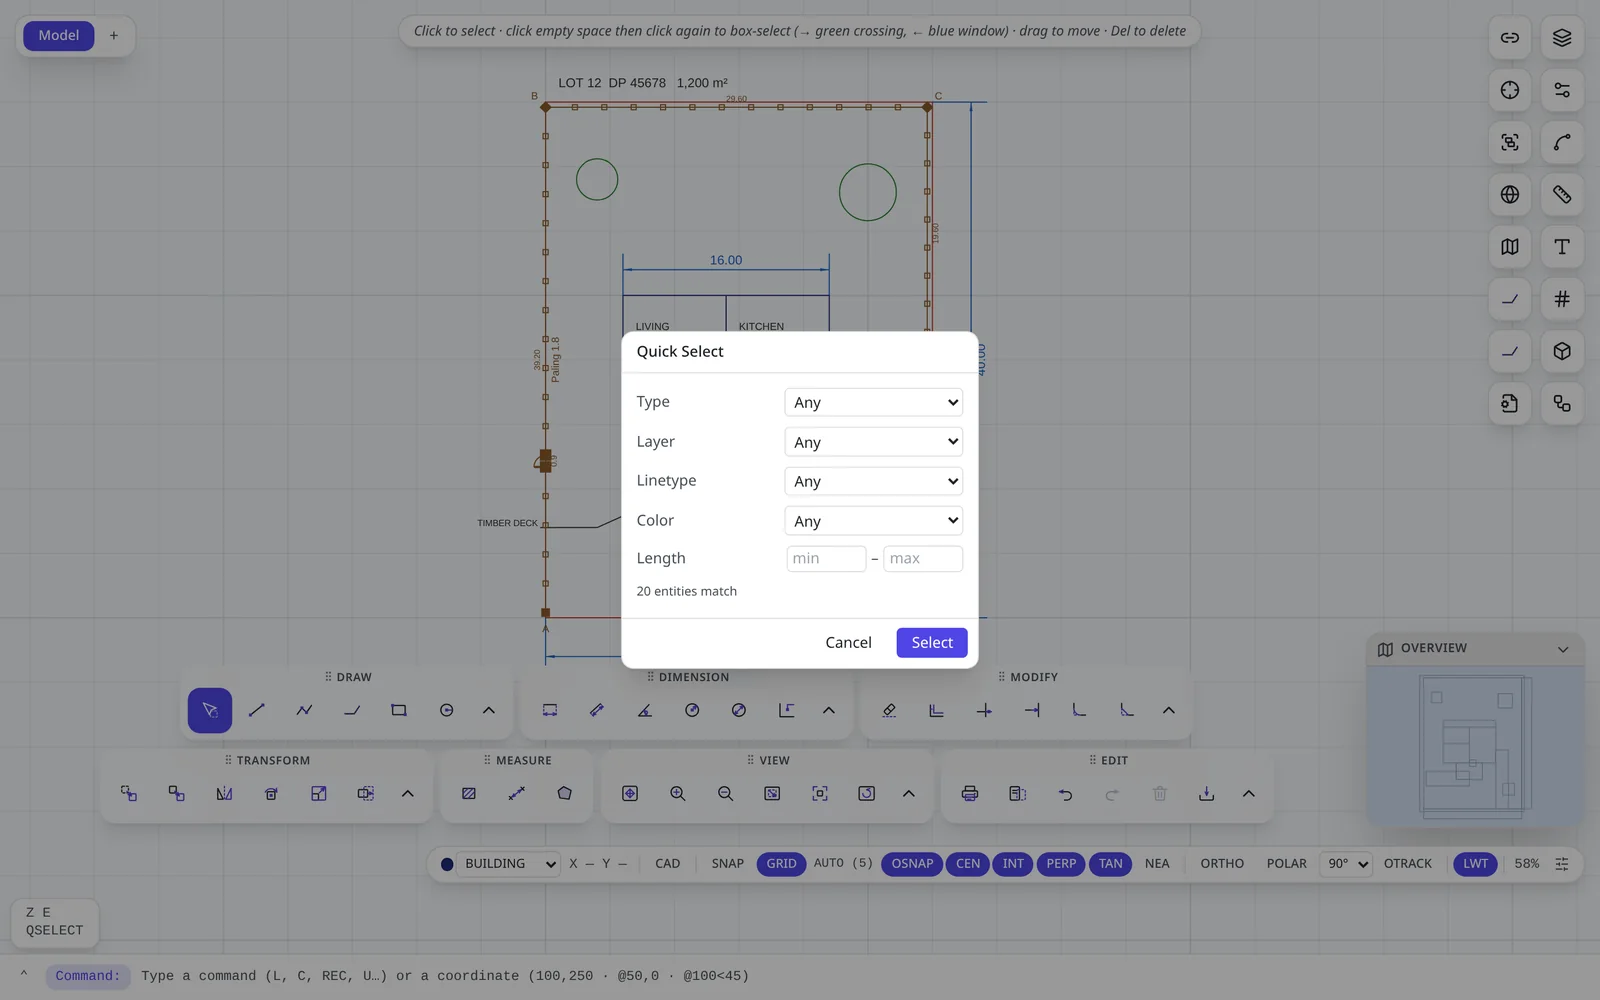
Type QSELECT (QSE) to select by property. Choose a Type, Layer, Linetype, Color and an optional Length range; the dialog shows how many objects match before you click Select.
Example: select every circle on the LANDSCAPE layer — Type = Circle, Layer = LANDSCAPE, Select — then change their colour in the Properties panel in one go.
Groups
Select objects and type GROUP (G) to bind them into a named group that selects as one. UNGROUP dissolves it. GROUPS opens the group manager, where you can rename, select or remove groups.
Editing
Chapter 9: Modifying geometry
| Command | Alias | What it does · how |
|---|---|---|
| MOVE | M | Select, base point, destination. M ⏎ (select) ⏎ 0,0 ⏎ @5,0 |
| COPY | CO, CP | As MOVE, but leaves the original. Keeps placing copies until Esc. |
| ROTATE | RO | Base point, then an angle (typed or picked). |
| SCALE | SC | Base point, then a factor — 2 doubles, 0.5 halves. |
| MIRROR | MI | Two points defining the mirror line. |
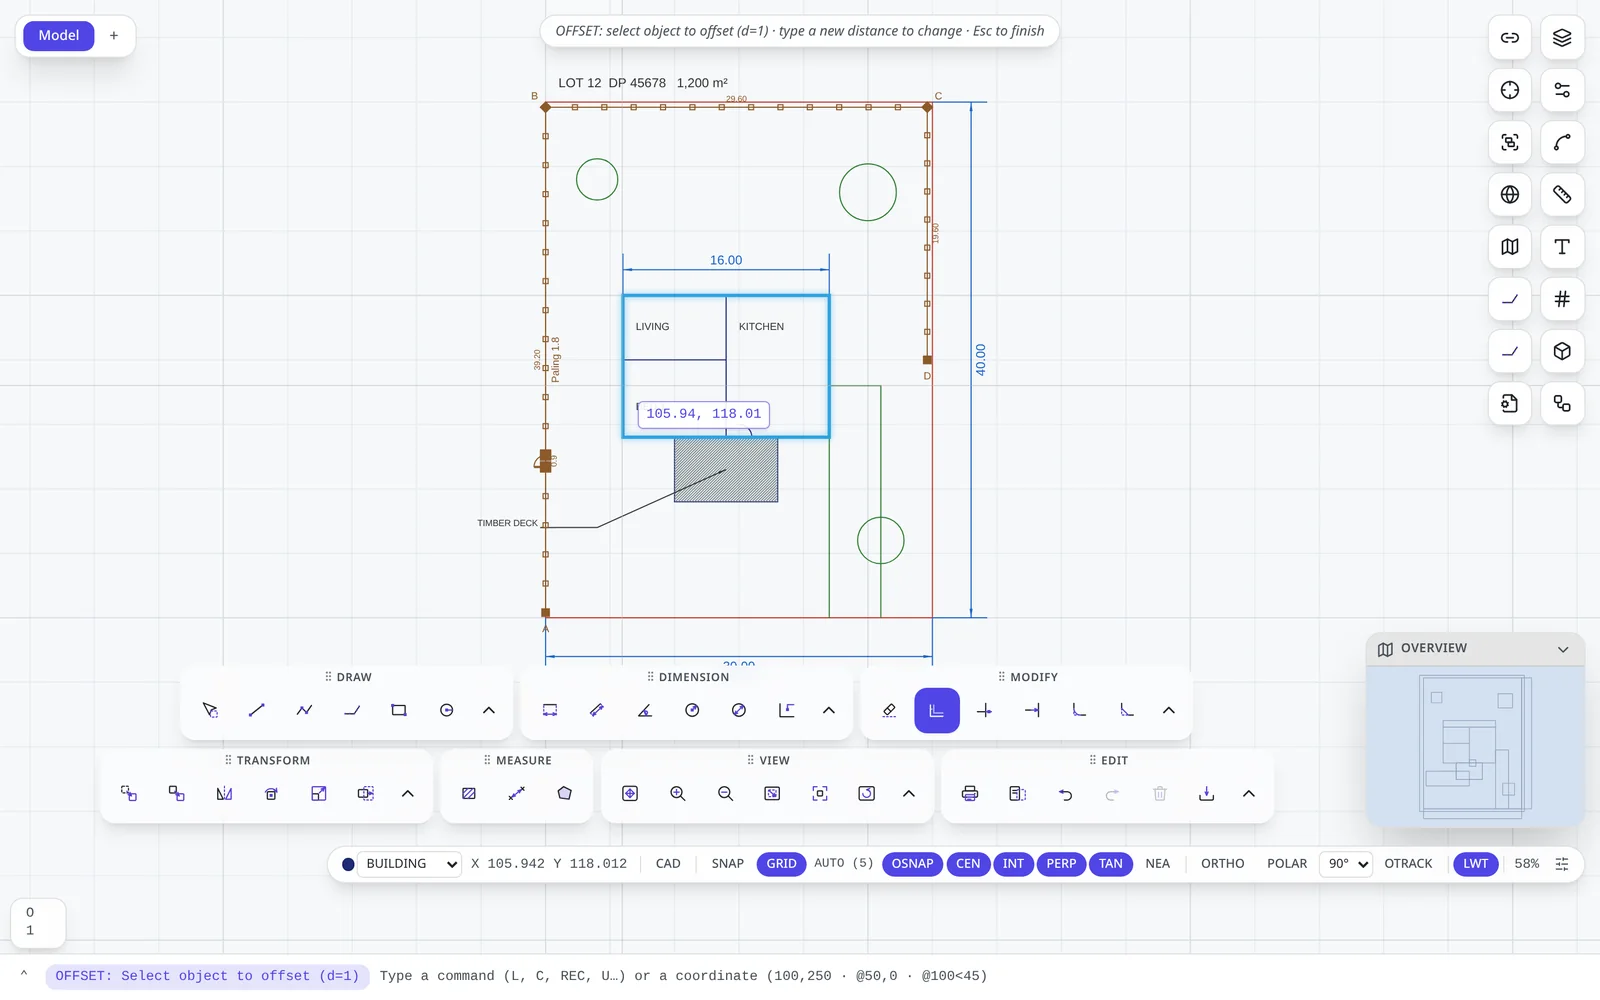
| OFFSET | O | Distance, pick an object, click the side. Repeats until Esc. |
| TRIM | TR | Click each piece to cut away at its nearest crossing. |
| EXTEND | EX | Click near an end to extend it to the next object. |
| FILLET | F | Pick two objects to join with a rounded (or sharp, radius 0) corner. |
| CHAMFER | CHA | Pick two objects to join with a bevelled corner. |
| BREAK | BR | Split an object at one point or remove the part between two. |
| JOIN | J | Join touching lines and arcs into one polyline. |
| STRETCH | — | Window the vertices to move; they move, the rest stays. |
| LENGTHEN | LEN | Change a length by Delta, Percent, Total or Dynamically. |
| ALIGN | AL | Two source and two target points; optionally scale to fit (Y/N). |
| ARRAY | AR | Rows and columns, or copies around a centre. |
| PEDIT | PE | Close/Open, Join, Width, Fit, Spline, Decurve, Reverse a polyline. |
| EXPLODE | X | Break blocks, polylines and dimensions into their parts. |
| DIVIDE / MEASURE | DIV / ME | Place points dividing an object into N parts, or every N units along it. |
| MATCHPROP | MA | Copy layer, colour, linetype etc. from one object to others. |
| ERASE | E, DEL | Delete the selection (or press Del). |
O Enter 1 Enter, click the house, click outside it, Esc. Then select the new rectangle and set its Linetype to DASHED in Properties.Organisation
Chapter 10: Layers, linetypes & lineweights
Layers are how you organise a drawing: put boundaries, buildings, dimensions and notes on separate layers so you can colour, hide, lock and plot them independently.
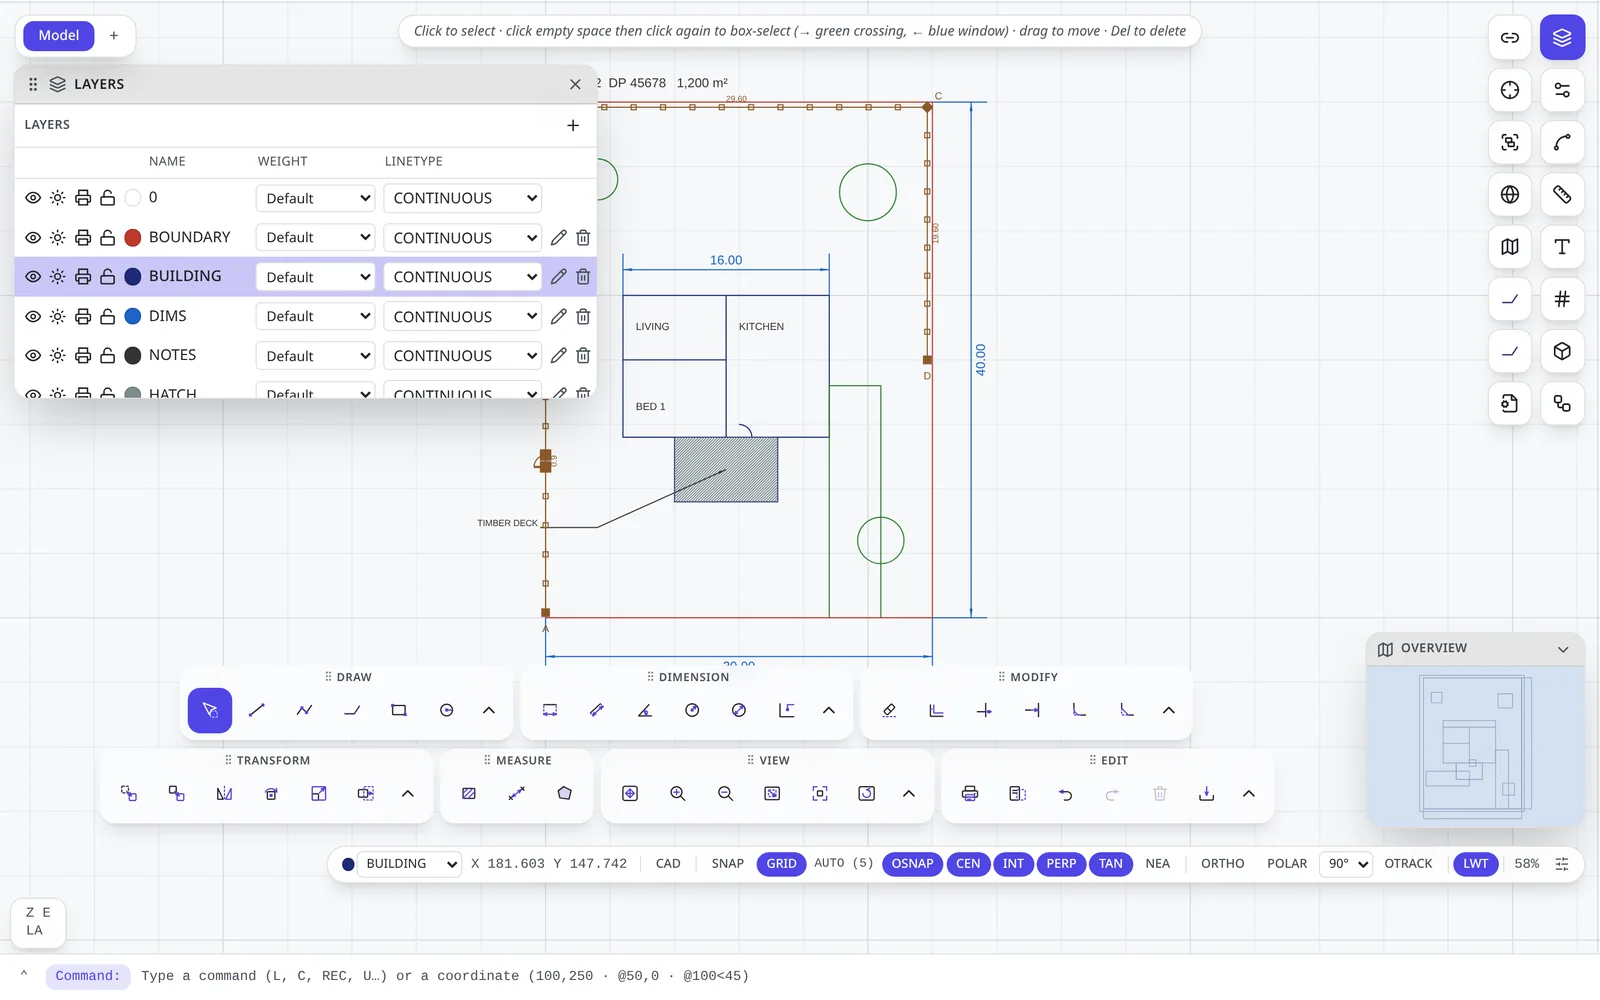
LA). The highlighted row is the current layer.The Layers panel
Each row has, from the left: on/off (eye), freeze (sun), plot (printer), lock (padlock), the layer colour, its name, lineweight and linetype, then rename and delete. Click + to add a layer. Click a row to make it current.
- Off hides a layer. Frozen also hides it and excludes it from selection everywhere.
- Locked layers stay visible but cannot be selected or edited — ideal for a survey you trace over.
- Turning plot off keeps a layer on screen but leaves it out of PDFs.
Layer commands
| Command | Effect |
|---|---|
LAYISO | Isolate: show only the layers of the selected objects. |
LAYUNISO | Restore the visibility from before LAYISO. |
LAYMRG | Merge the selected objects' layers into the current layer. |
LAYDEL | Delete the selected objects' layers together with everything on them. |
Linetypes
LT opens the Linetype panel: CONTINUOUS, DASHED, DOTTED, CENTER, HIDDEN, DASHDOT and more. Assign a linetype to a layer or to individual objects. LTSCALE (LTS) sets how long the dashes are across the whole drawing; each object's own LT scale fine-tunes it.
Lineweights
Set lineweights per layer in the Layers panel or per object in Properties. Turn on LWT on the status bar to see them on screen; they always apply when you plot.
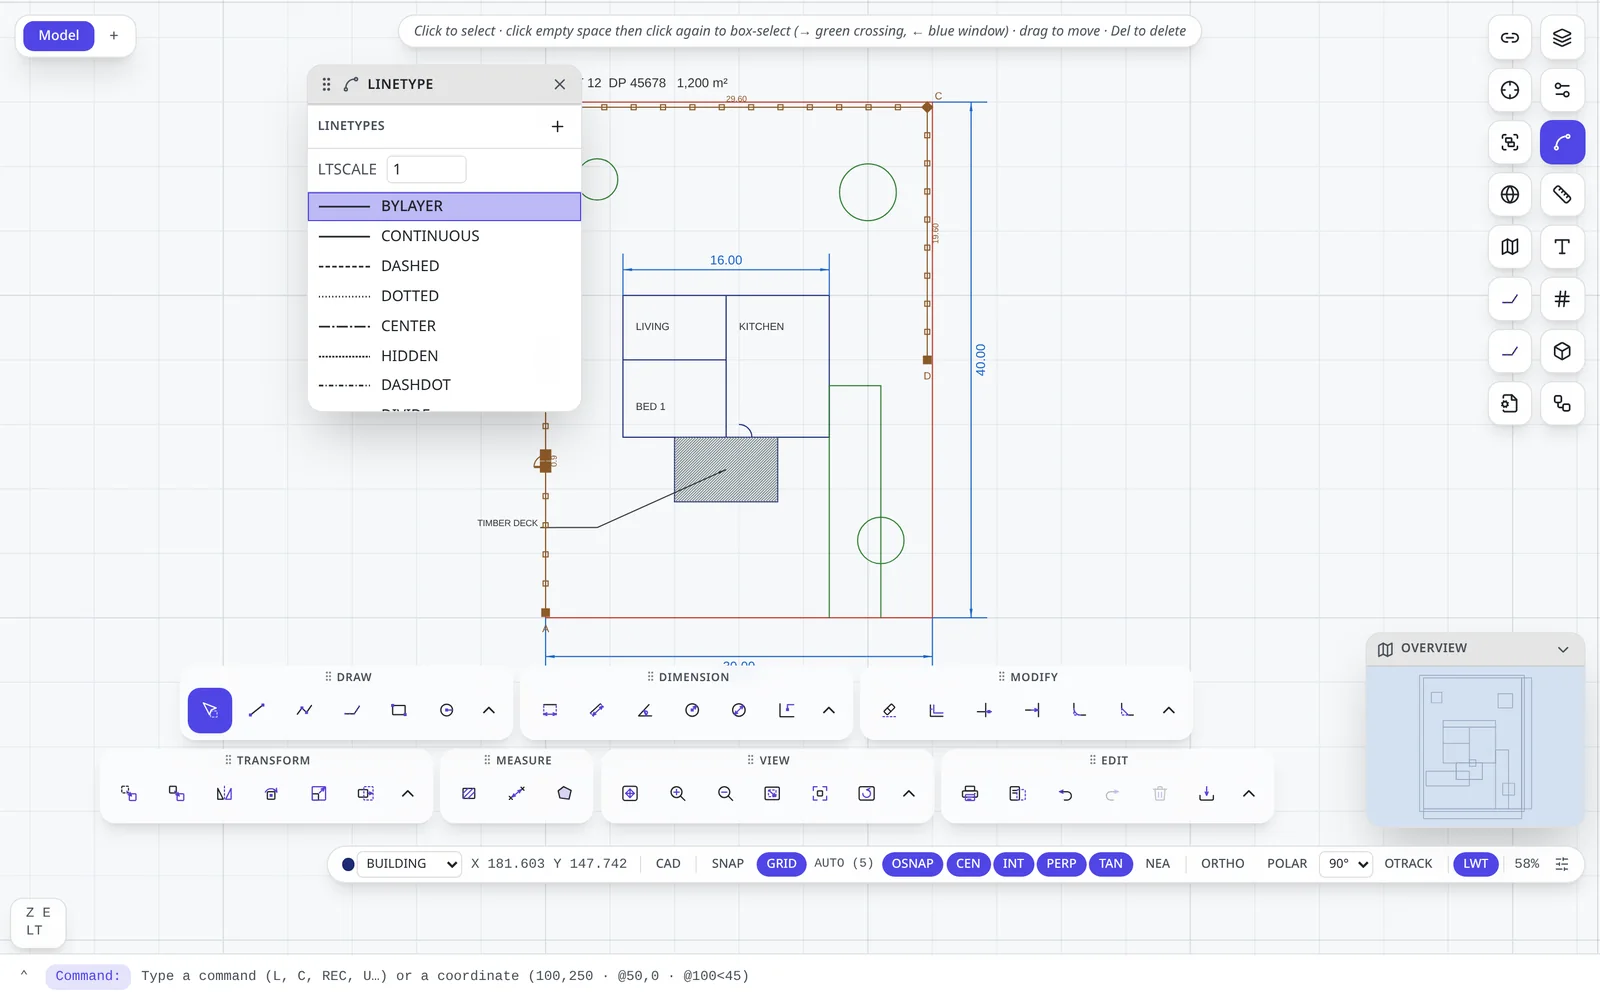
Annotation
Chapter 11: Text, tables & leaders
| Command | How to use it |
|---|---|
TEXT (T) | Click where the text starts and type directly in the drawing. Enter finishes. Double-click any text later to edit it in place. |
MTEXT (MT) | Drag a box; type a paragraph that wraps to the box width. Bold, italic and other formatting are available while editing. |
TABLE (TB) | Click to place a table. Double-click a cell to type in it; set rows, columns, sizes and cell alignment in Properties. |
LEADER (LE, MLD) | Click the arrow tip, a bend point and the end; then type the note. In the sample drawing, TIMBER DECK is a leader. |
STYLE (ST) | Text styles: font, fixed height, width factor, oblique angle, bold and italic. New text uses the current style. |
| UPDATEFIELD | Recalculate field values inside block attributes (e.g. an area or date in a title block). |
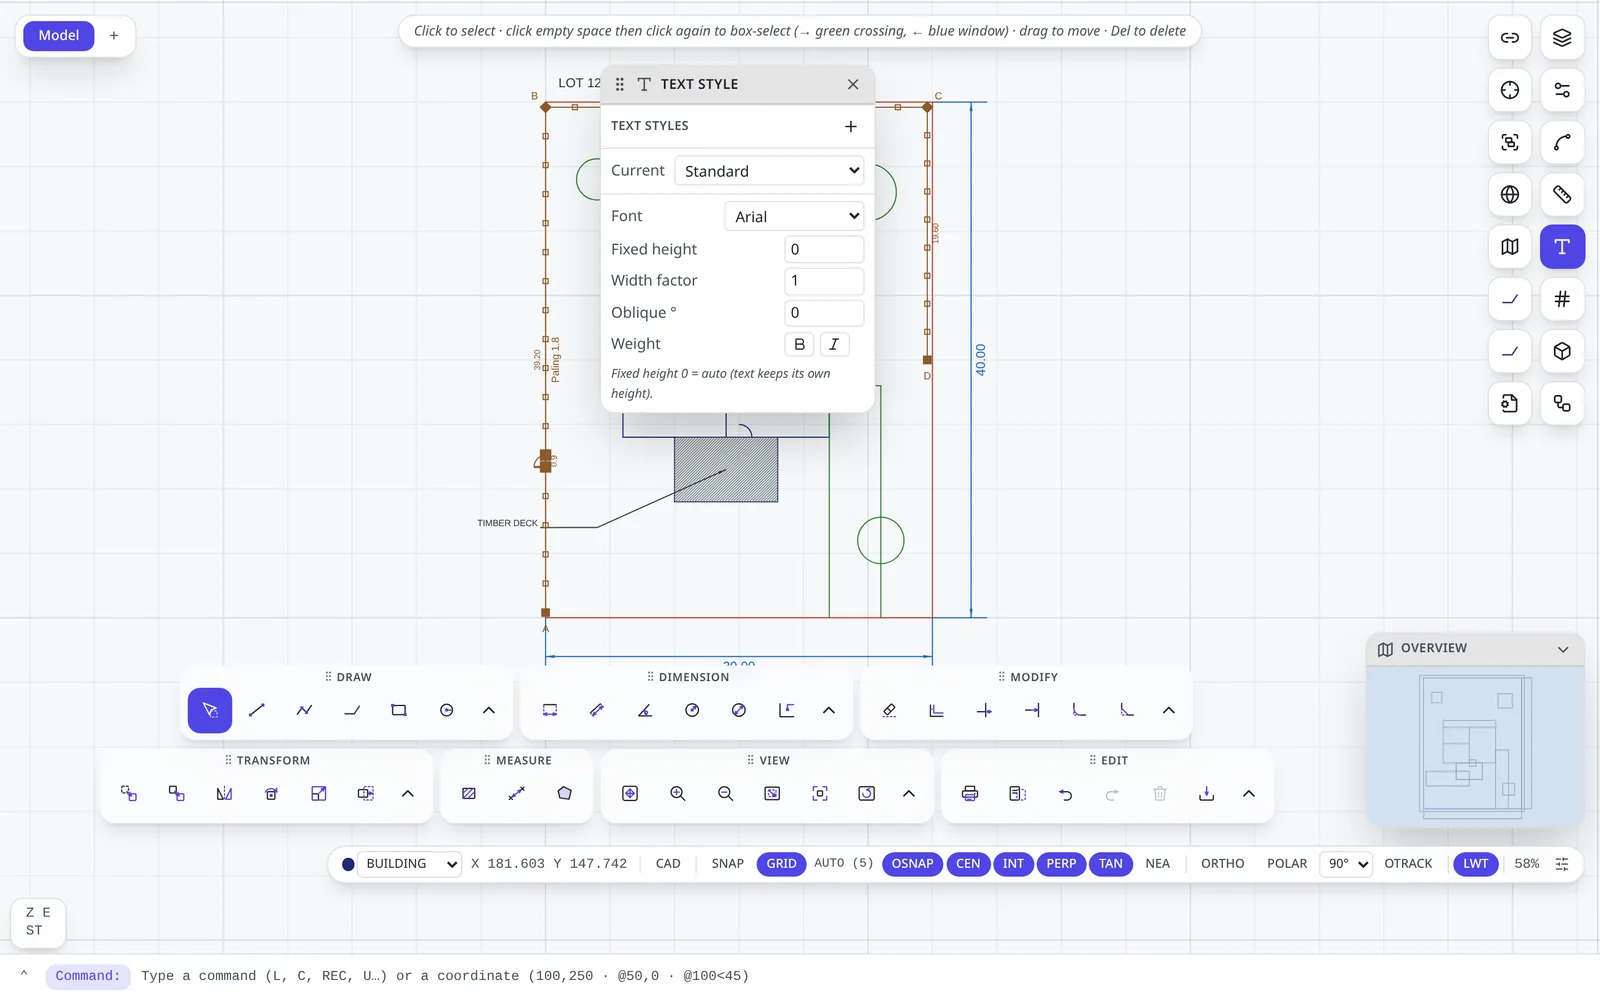
Annotation
Chapter 12: Dimensions
Dimensions are associative: when the geometry they measure changes, the dimension follows and its value updates.
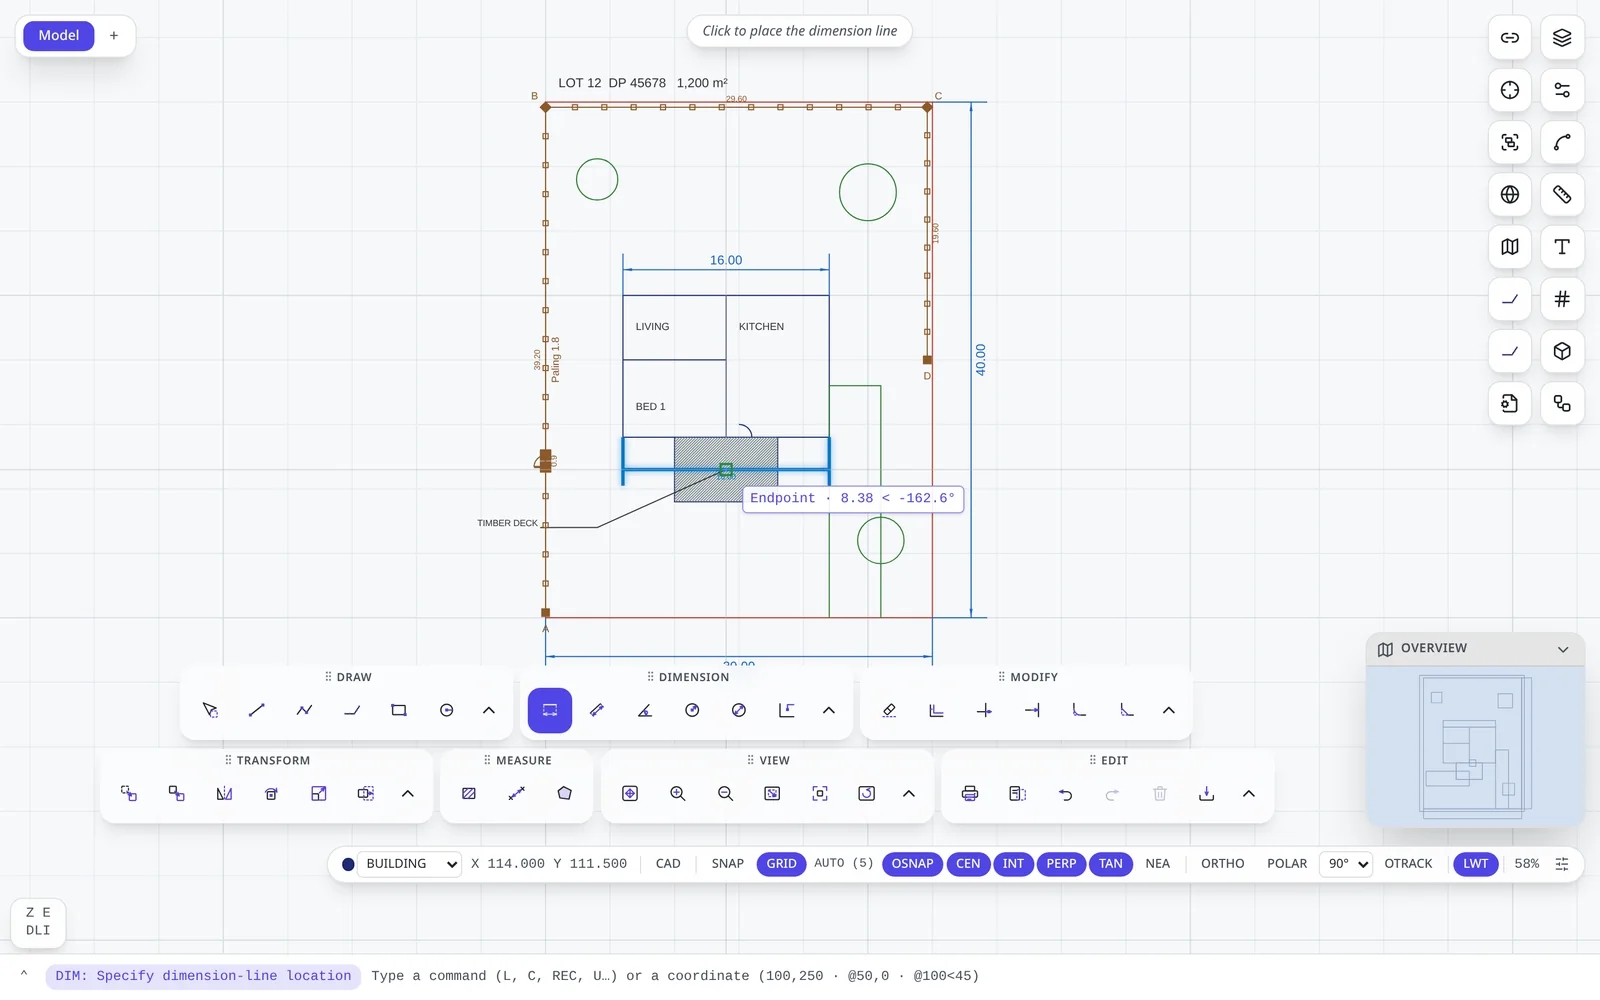
| Command | Alias | Measures |
|---|---|---|
| DIMLINEAR | DLI | Horizontal or vertical distance — direction follows your drag. |
| DIMALIGNED | DAL | True distance, parallel to the two points. |
| DIMANGULAR | DAN | The angle between two lines. |
| DIMRADIUS / DIMDIAMETER | DRA / DDI | Radius or diameter of a circle or arc. |
| DIMORDINATE | DOR | X or Y coordinate of a feature from the datum. |
| DIMARC | DAR | The length along an arc. |
| DIMBASELINE | DBA | More dimensions from the same baseline as the last one. |
| DIMCONTINUE | DCO | A chain of dimensions end-to-end. |
Dimension styles
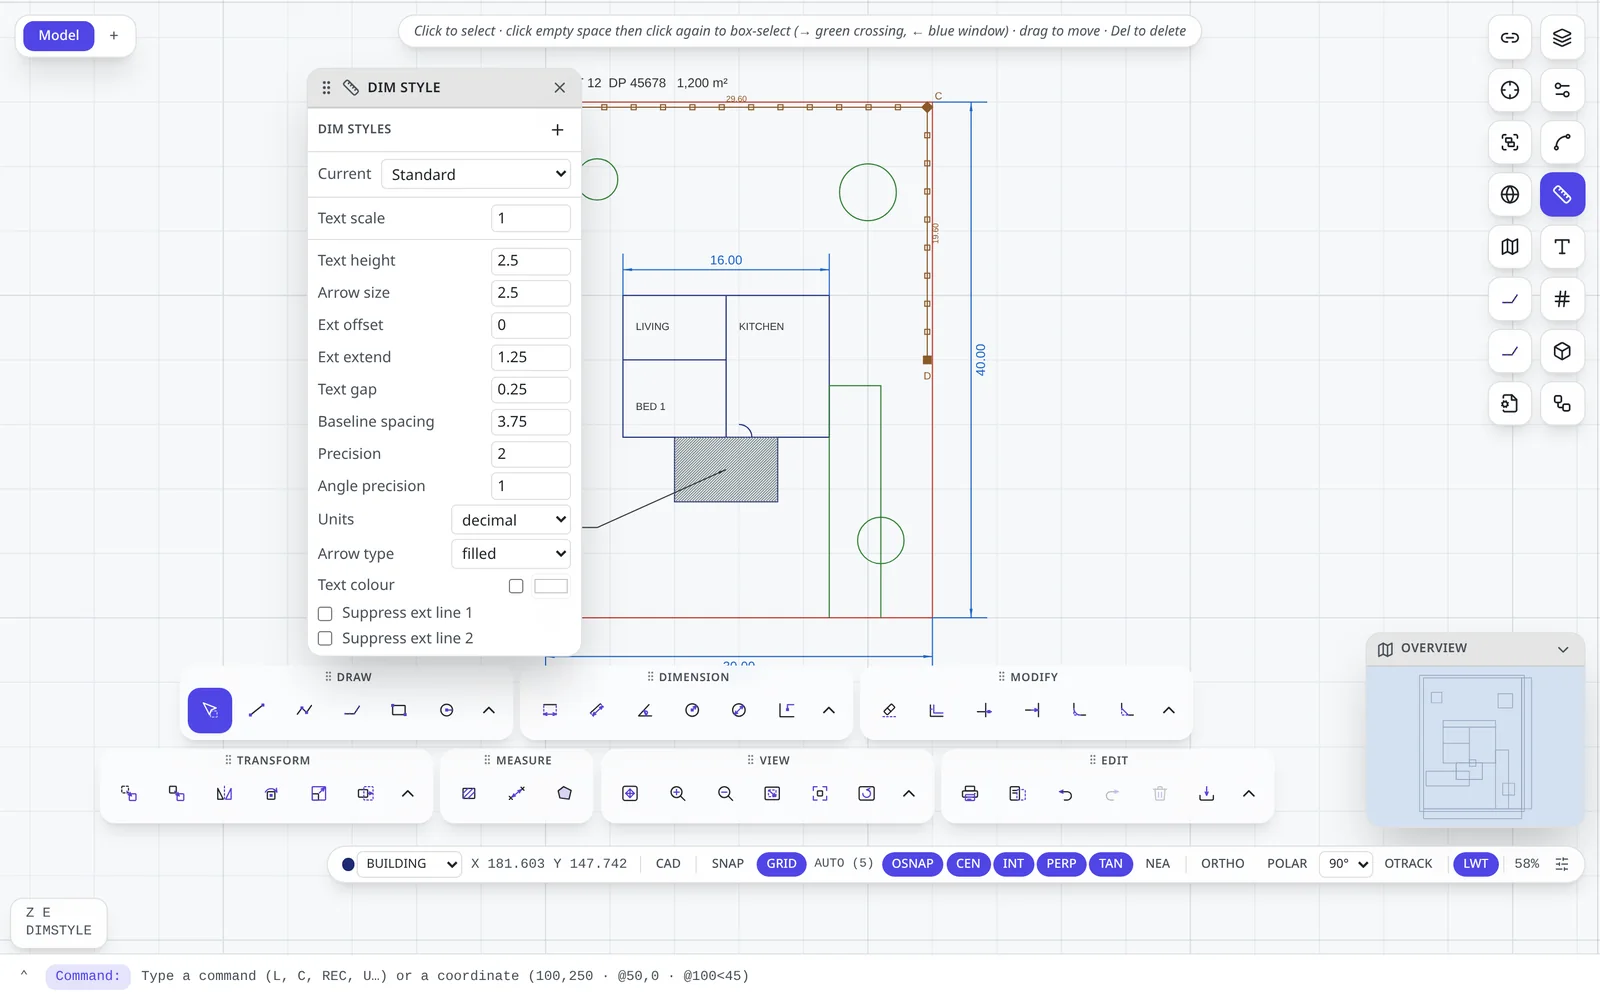
DIMSTYLE (D) opens the Dim Style panel. A style controls text height and scale, arrow size and type, extension-line offset and extension, text gap, baseline spacing, precision and angle precision, units, text colour, and whether extension lines are suppressed. Create a style with +, choose it as Current, and new dimensions use it.
To override one dimension, select it and change its text, size or arrows in Properties.
Fills & areas
Chapter 13: Hatching & regions
Hatching an area
- Type
H(or click Hatch in the Measure group). The prompt reads HATCH: Click on or inside a closed boundary to fill it. - Click inside any closed area. BranchCAD finds the boundary itself — including islands inside it, which are left unfilled.
- Select the hatch to change its Pattern (ANSI31, EARTH, SOLID and others), Angle, Scale and Line weight, or type
HEto edit it.
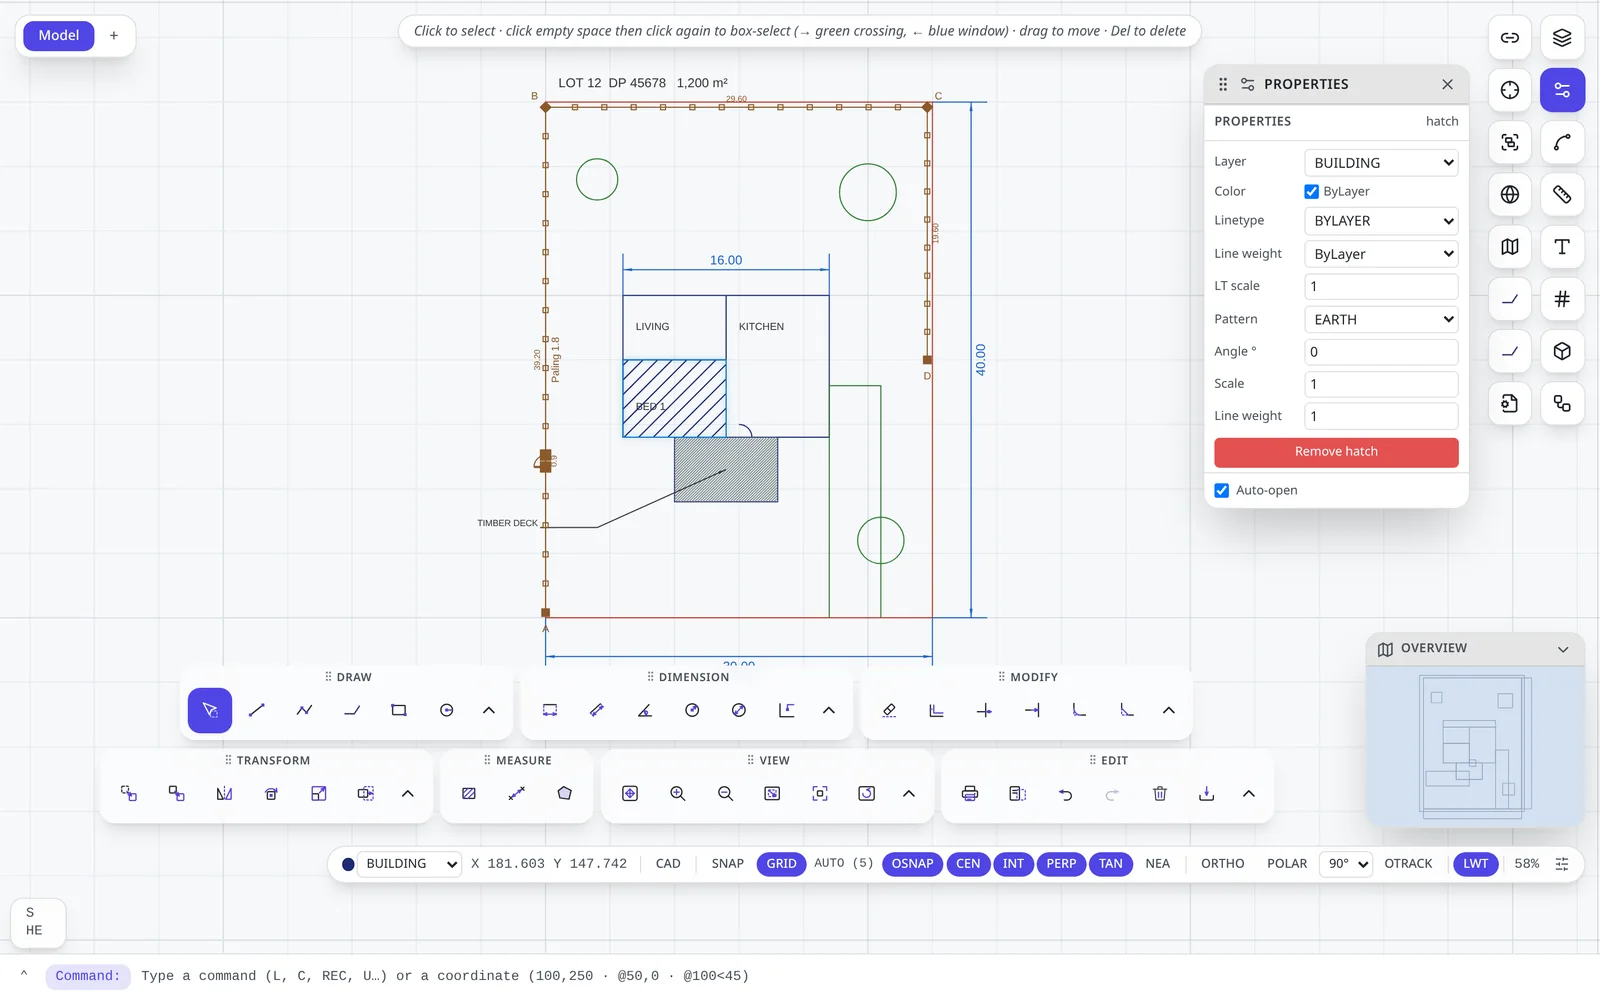
Hatches are associative: move or stretch the boundary and the hatch refills to match.
Regions and boolean shapes
A region is a filled area that can have holes. Select closed shapes and type REGION (REG, BO) to convert them. Then combine regions:
UNION(UNI) — merge into one shape.SUBTRACT(SU) — cut the others out of the first one you selected.INTERSECT(INT) — keep only the overlap.
Reuse
Chapter 14: Blocks, images & external references
Blocks
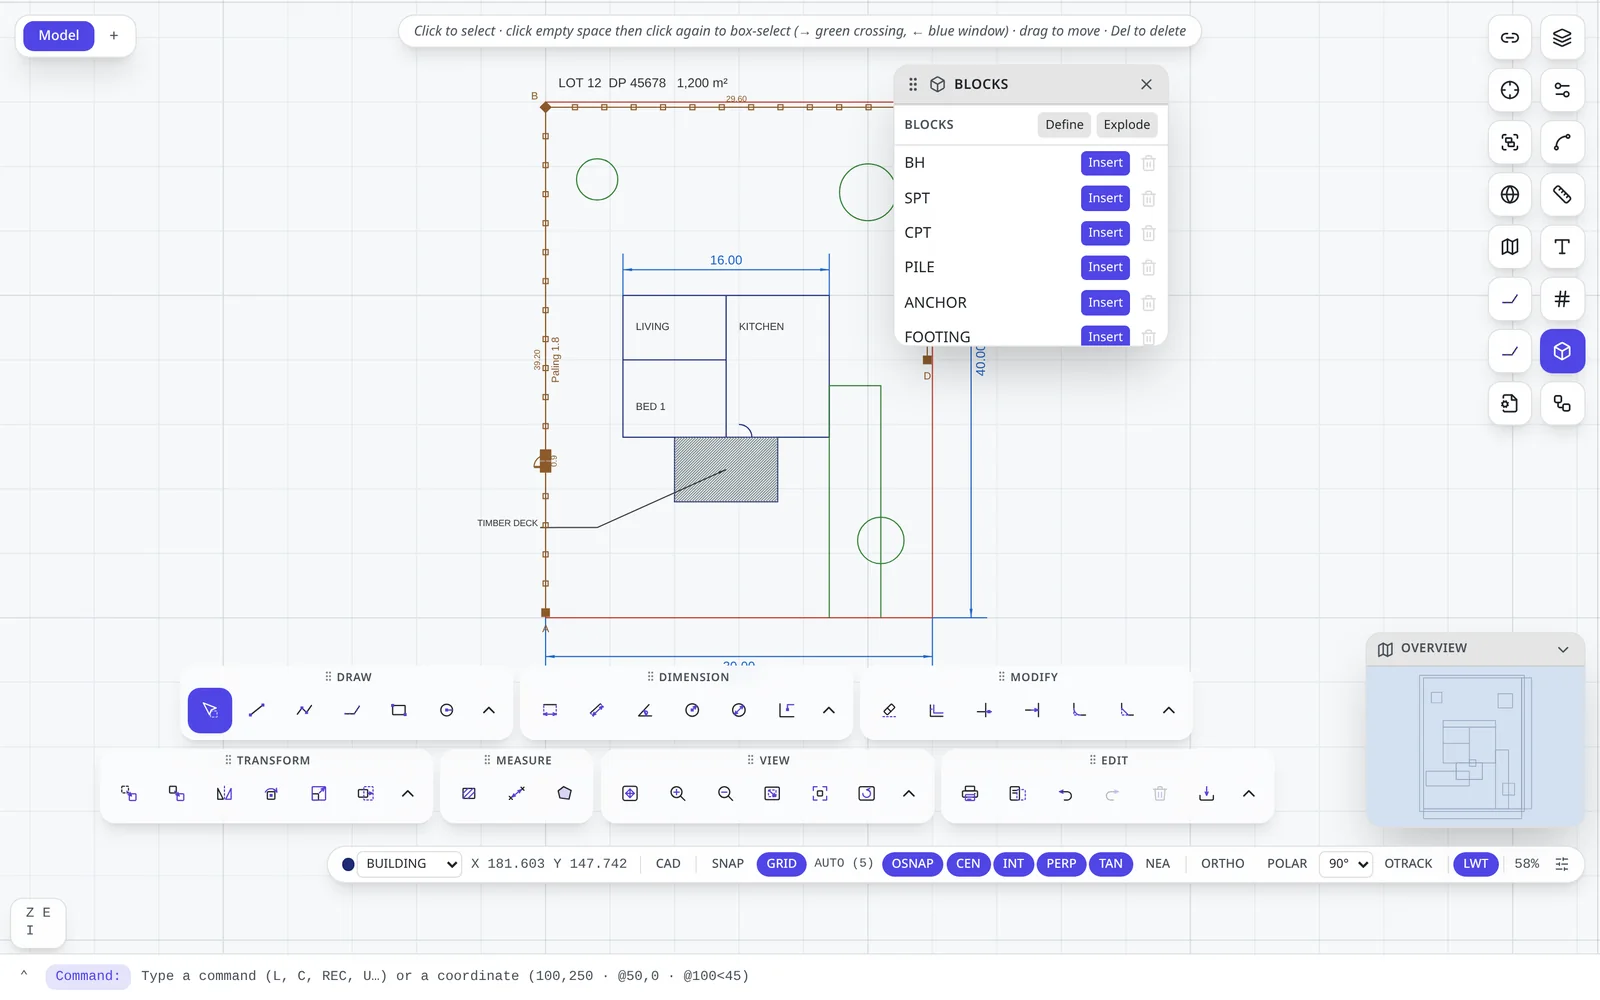
A block is a named, reusable symbol. Every drawing starts with a library of built-in blocks such as BH, SPT, CPT, PILE, ANCHOR and FOOTING.
- Type
I(INSERT) to open the Blocks panel. - Click Insert beside a block. It follows the cursor.
- Type
Sto set a scale orRto set a rotation, then click to place it.
To make your own block, select the objects and type B (BLOCK), or click Define in the panel. Explode (or X) turns an inserted block back into separate objects. Blocks may carry attributes — text values such as a tag or a level — that you fill in for each insert.
External references (XREFs)
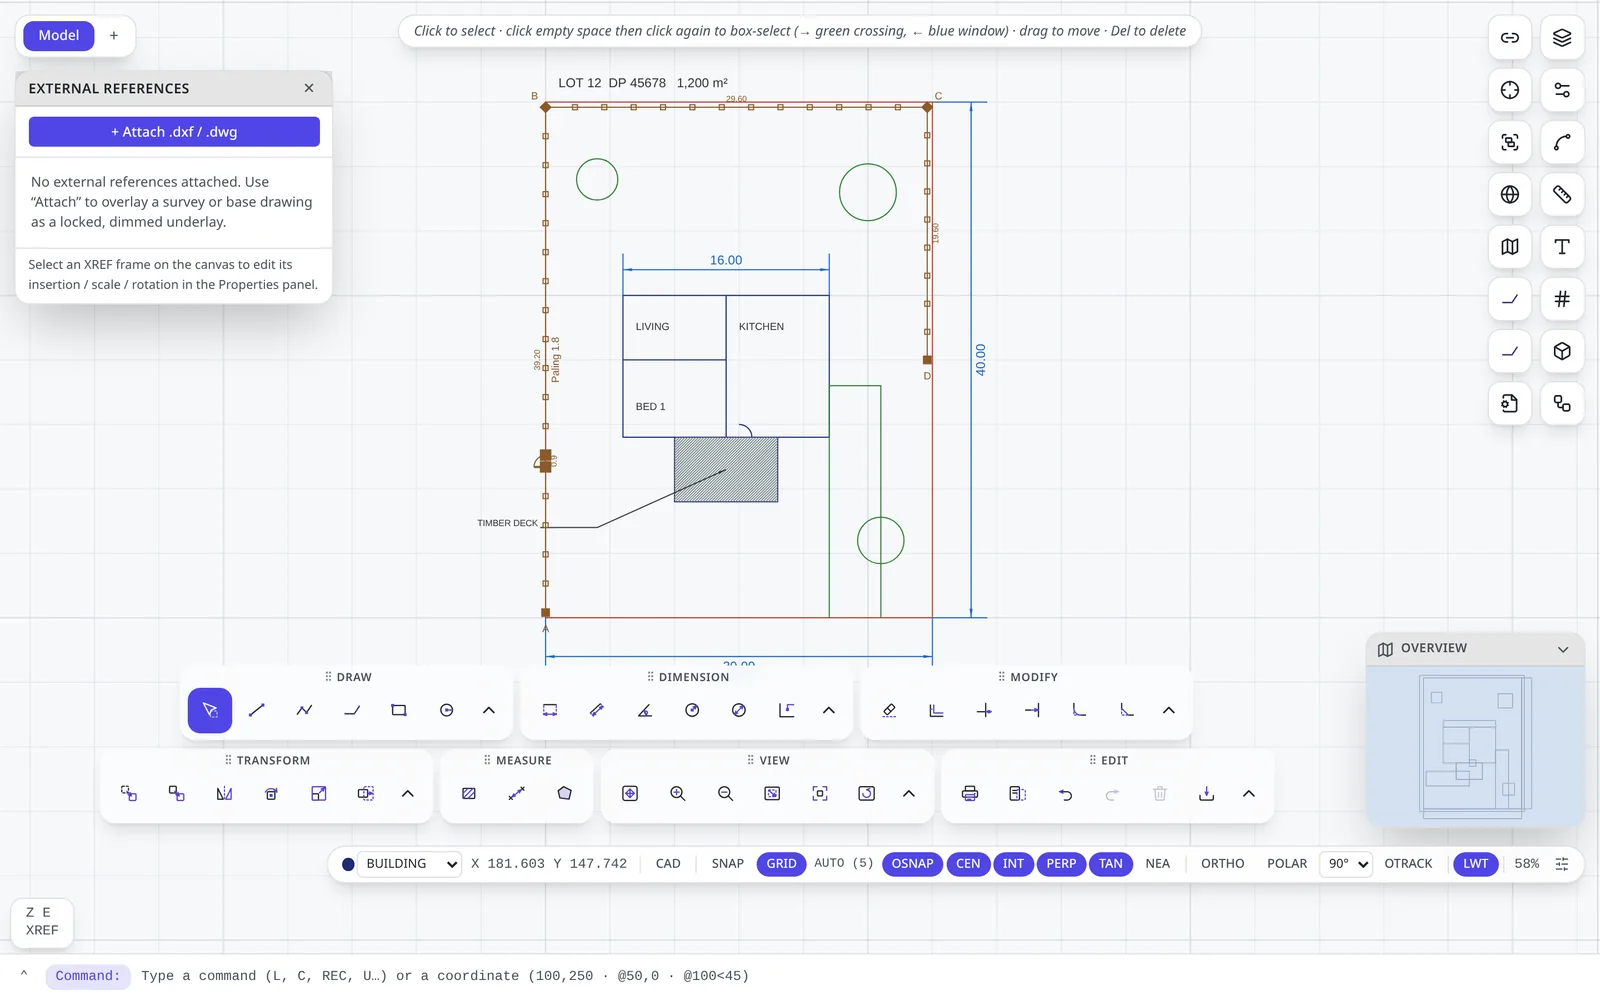
An XREF overlays another DXF or DWG file — a survey, a base plan from an architect — as a locked, dimmed underlay that you can snap to but not accidentally edit.
XREF(XR) opens the manager;XATTACH(XA) or + Attach .dxf / .dwg picks a file.- Select an XREF frame to set its insertion point, scale and rotation in Properties.
XBINDcopies the XREF's contents into your drawing permanently;XDETACHremoves it.
Raster images
Type IMAGE (IAT) to attach a PNG or JPEG — a scanned plan or a photo — and place, scale and rotate it like any object. Images can be traced over with snaps and are included in plots.
Inquiry
Chapter 15: Measuring
| Command | Use |
|---|---|
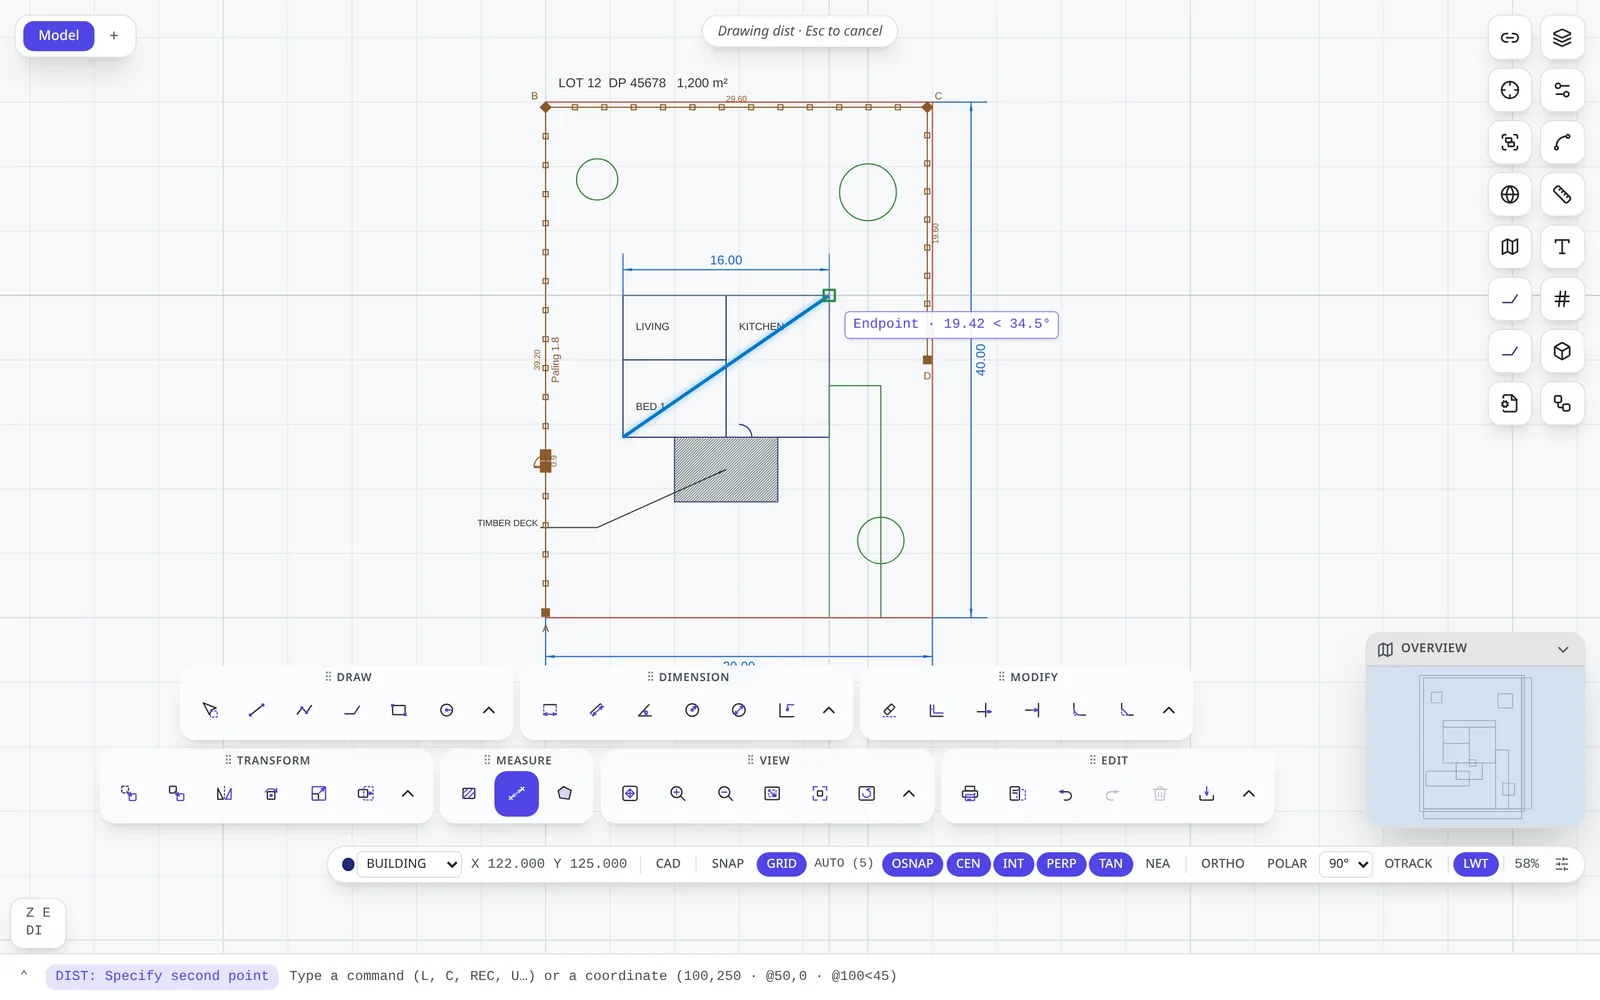
DIST (DI) | Click two points. The command line reports the distance, the angle and the ΔX / ΔY between them. |
AREA (AA) | Click the corners of an area and type C to close. Reports area and perimeter. |
| Properties panel | Select a closed polyline, circle, region or hatch to read its area and length directly; select a fence to read its total length and number of gates. |
Output
Chapter 16: Layouts, sheets & plotting
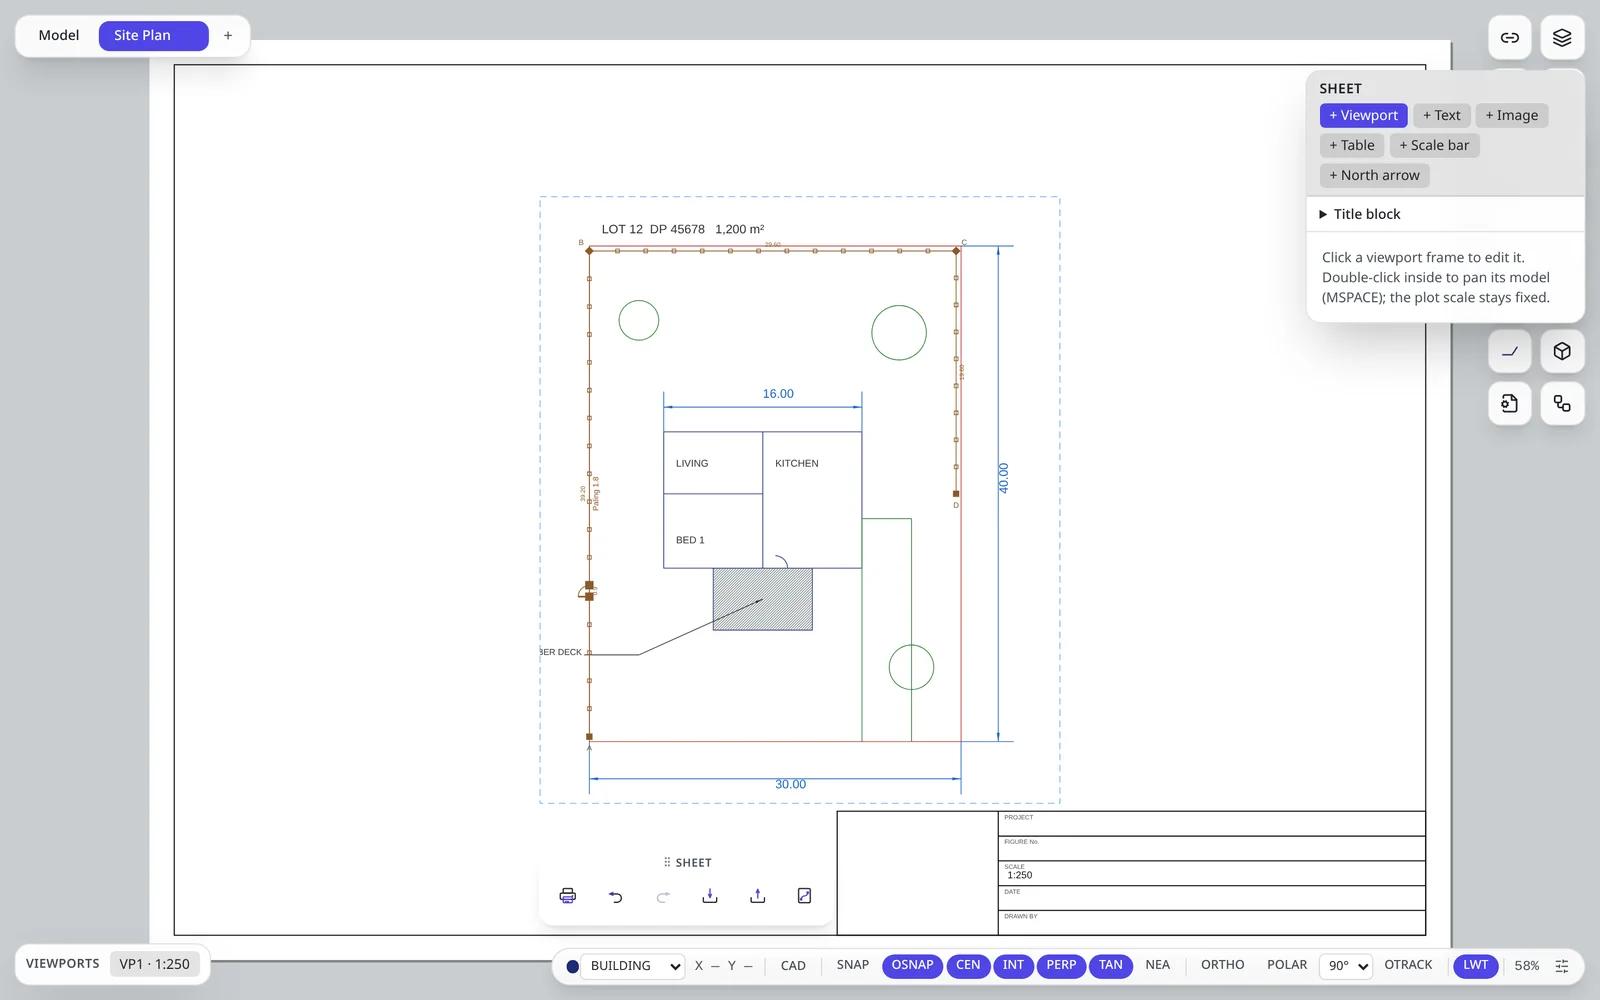
Draw at full size in Model space; arrange it on paper in a layout. A layout is a sheet of paper with one or more viewports — scaled windows onto the model.
Making a sheet
- Click + next to the Model tab, or type
LAYOUT(LO). Name the sheet and choose a paper size and orientation. - Click + Viewport in the Sheet panel (or type
MVIEW) and drag the viewport frame on the paper. - Select the viewport and set its scale (e.g. 1:250) in Properties. Double-click inside it to pan the model while the scale stays fixed; click outside to return to the paper.
- Fill in the Title block section — project, drawing title, scale, date, drawn by.
- Add a Scale bar and North arrow; they read their scale and orientation from the viewport.
PAGESETUP edits the active sheet's paper size, margins and plot scale.
Plotting to PDF
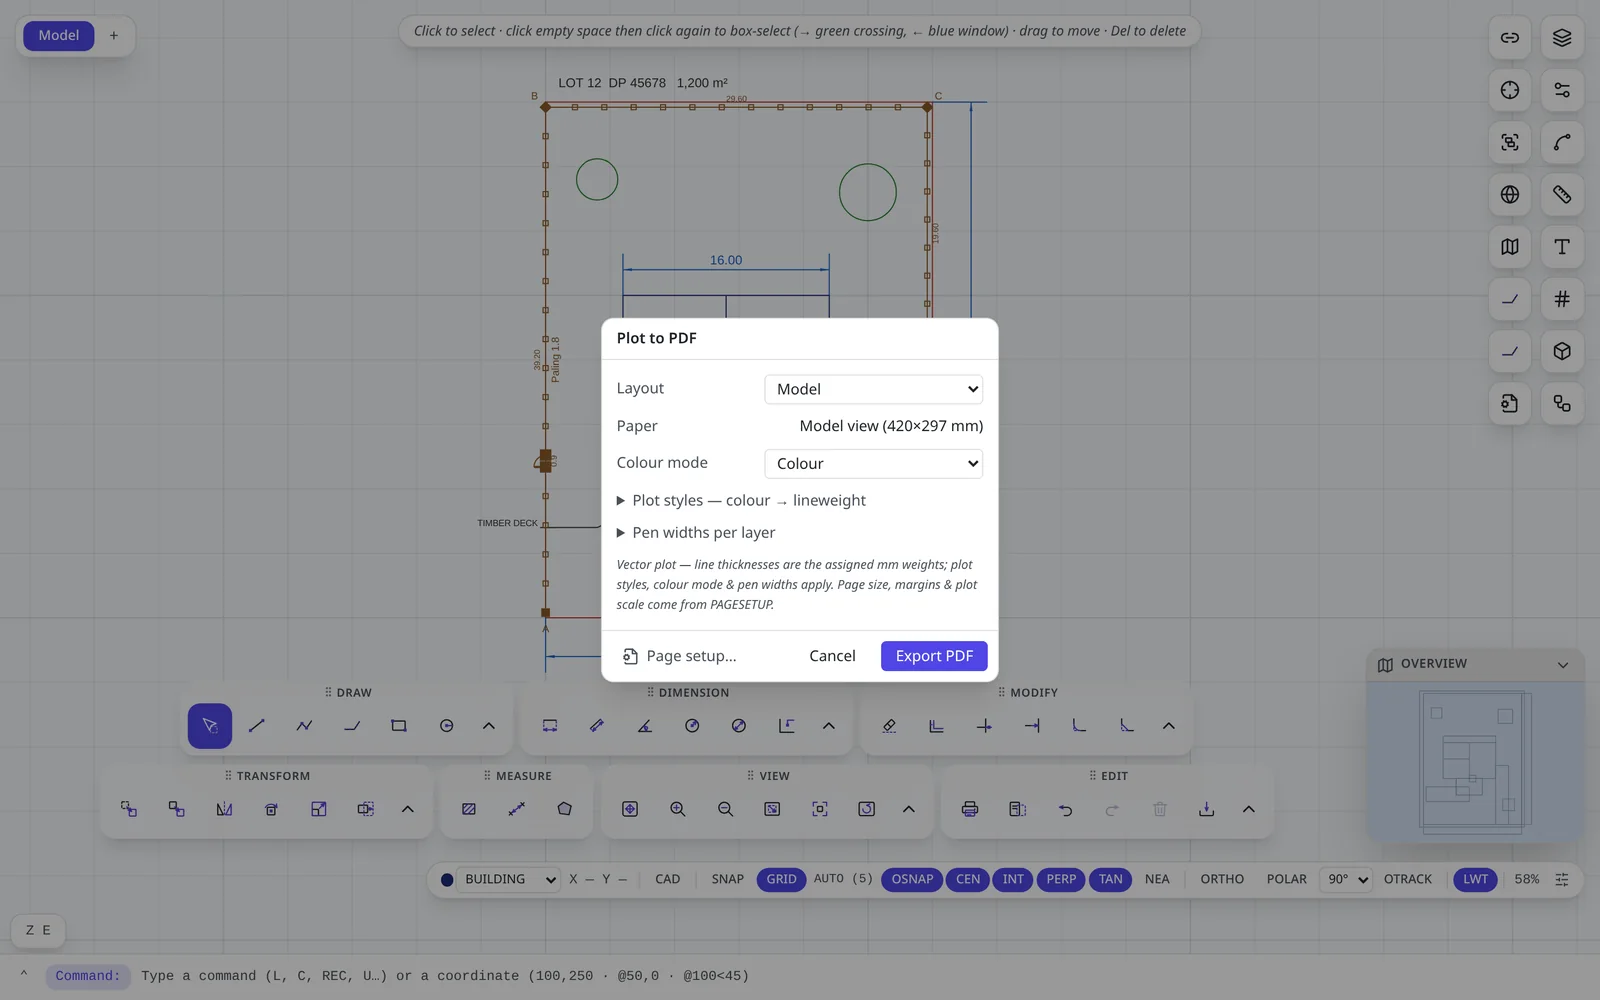
- Type
PLOT(or click the printer in the Edit group). - Choose the Layout to plot — the Model or any sheet.
- Choose a Colour mode: Colour, or monochrome for clean black-on-white drawings.
- Optionally open Plot styles (map colours to lineweights) or Pen widths per layer.
- Click Export PDF.
The PDF is a true vector plot: line thicknesses are the assigned millimetre weights and text stays sharp at any zoom.
Real-world location
Chapter 17: GIS & georeferencing
Georeferencing tells BranchCAD where your drawing sits on the earth. Your geometry stays in convenient local metres; BranchCAD translates to and from the map grid whenever you need it.
Georeference a drawing
- Type
GEOREF(or click the globe on the panel rail). - Choose the Coordinate system — NZTM2000, the NZ meridional circuits, or MGA2020 / MGA94 zones for Australia.
- Enter the grid coordinate of local (0,0): the easting (E) and northing (N) where your drawing's origin belongs. Round to 100 m tidies the values.
- Click Apply. The status changes to the CRS name, and the coordinate read-out shows E / N.
Geasting,northing input, the Properties panel and exports in grid coordinates.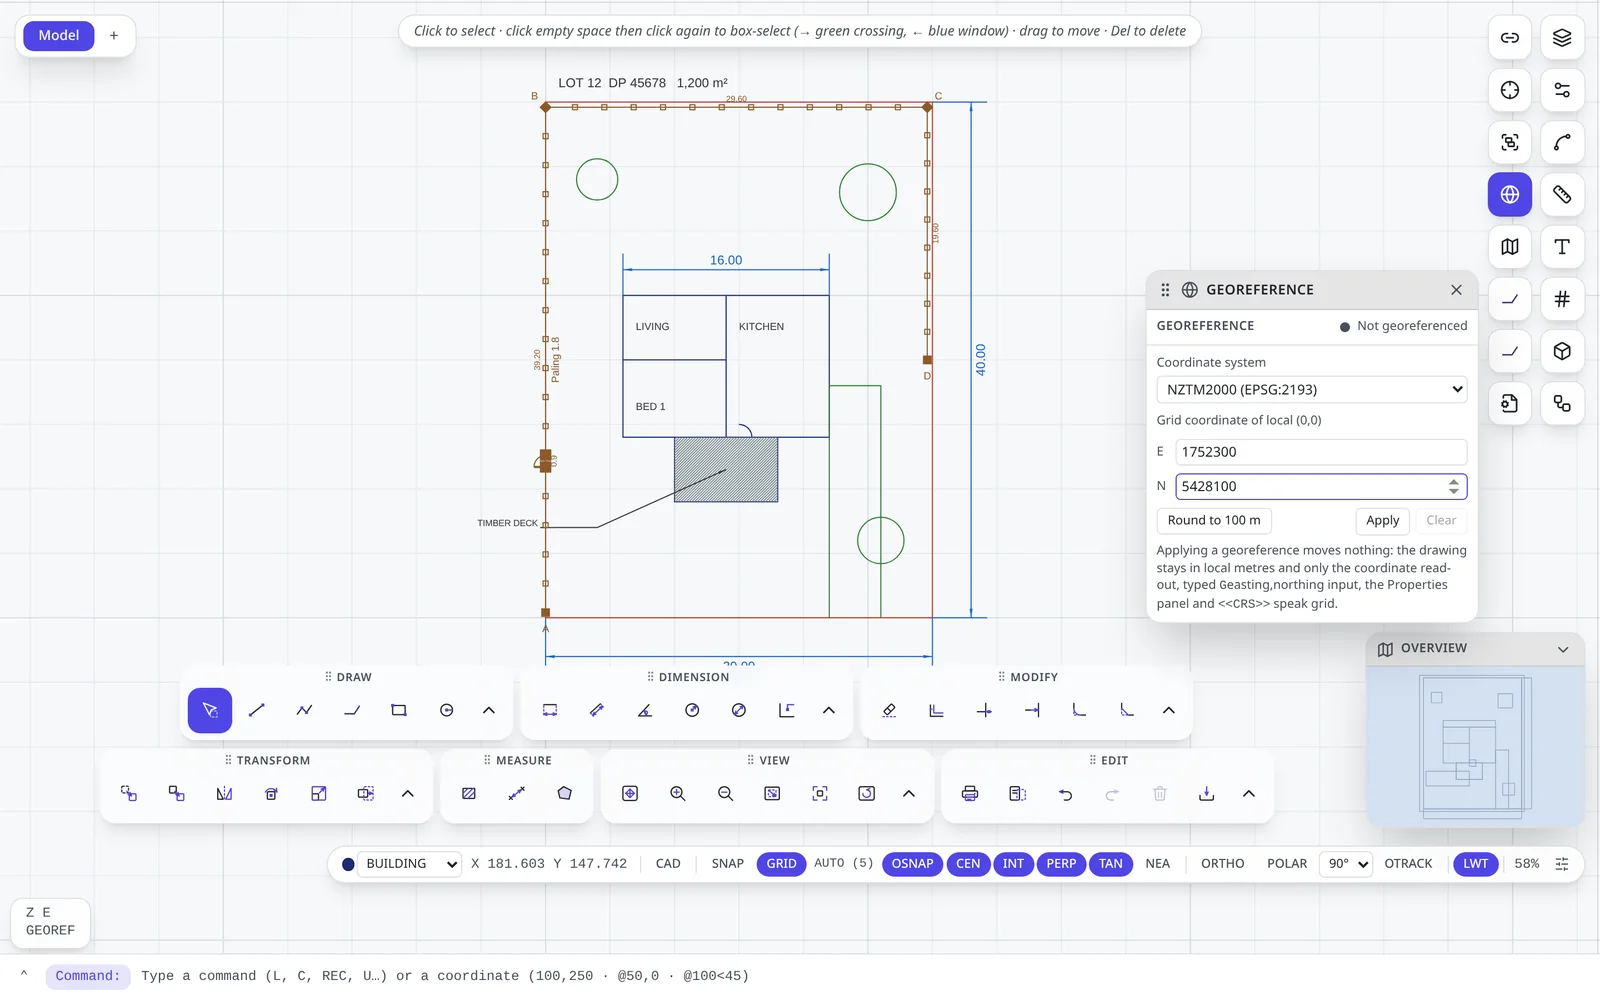
Working in grid coordinates
Once georeferenced, type a grid coordinate with a G prefix wherever a point is asked for: L Enter G1752300,5428100 Enter @20<90 Enter draws a line from that survey mark straight north for 20 m.
The GIS panel
Type GIS to open the GIS panel (currently available for New Zealand, New South Wales and Queensland):
- Basemap imagery — show satellite imagery (with or without labels) or a street map under your drawing. Imagery is drawn in the drawing's own projection.
- Address search (
ADDRESS) — type at least three characters to find a property and frame it. - Parcels — type
PARCELand click inside a property: its legal boundary is inserted on locked GIS layers, with its appellation. - Building outlines — type
BUILDING(BLDG) and click a house to insert its footprint as a closed polyline. The tool stays active, so click the next house to grab it too. Footprints are indicative, not survey-accurate.
Map mode
Type MAP to switch the editor to an interactive map environment — satellite, streets or terrain that you can pan, zoom and rotate, with your drawing overlaid in place. Type CAD to return to the CAD canvas. AOI (MAPAREA) lets you drag a rectangle to restrict the map to an area of interest.
GIS data in and out: CSVIN imports a CSV point schedule, GEOJSONIN imports GeoJSON features, and DXFOUT GRID exports a DXF in real grid coordinates (Chapter 19).
Specialist tools
Chapter 18: Fence design
A fence in BranchCAD is a single intelligent object. You draw the path and choose a fence type; BranchCAD generates the posts, rails, infill, gates, elevation and material list — and regenerates them every time you edit the path.
The fence library
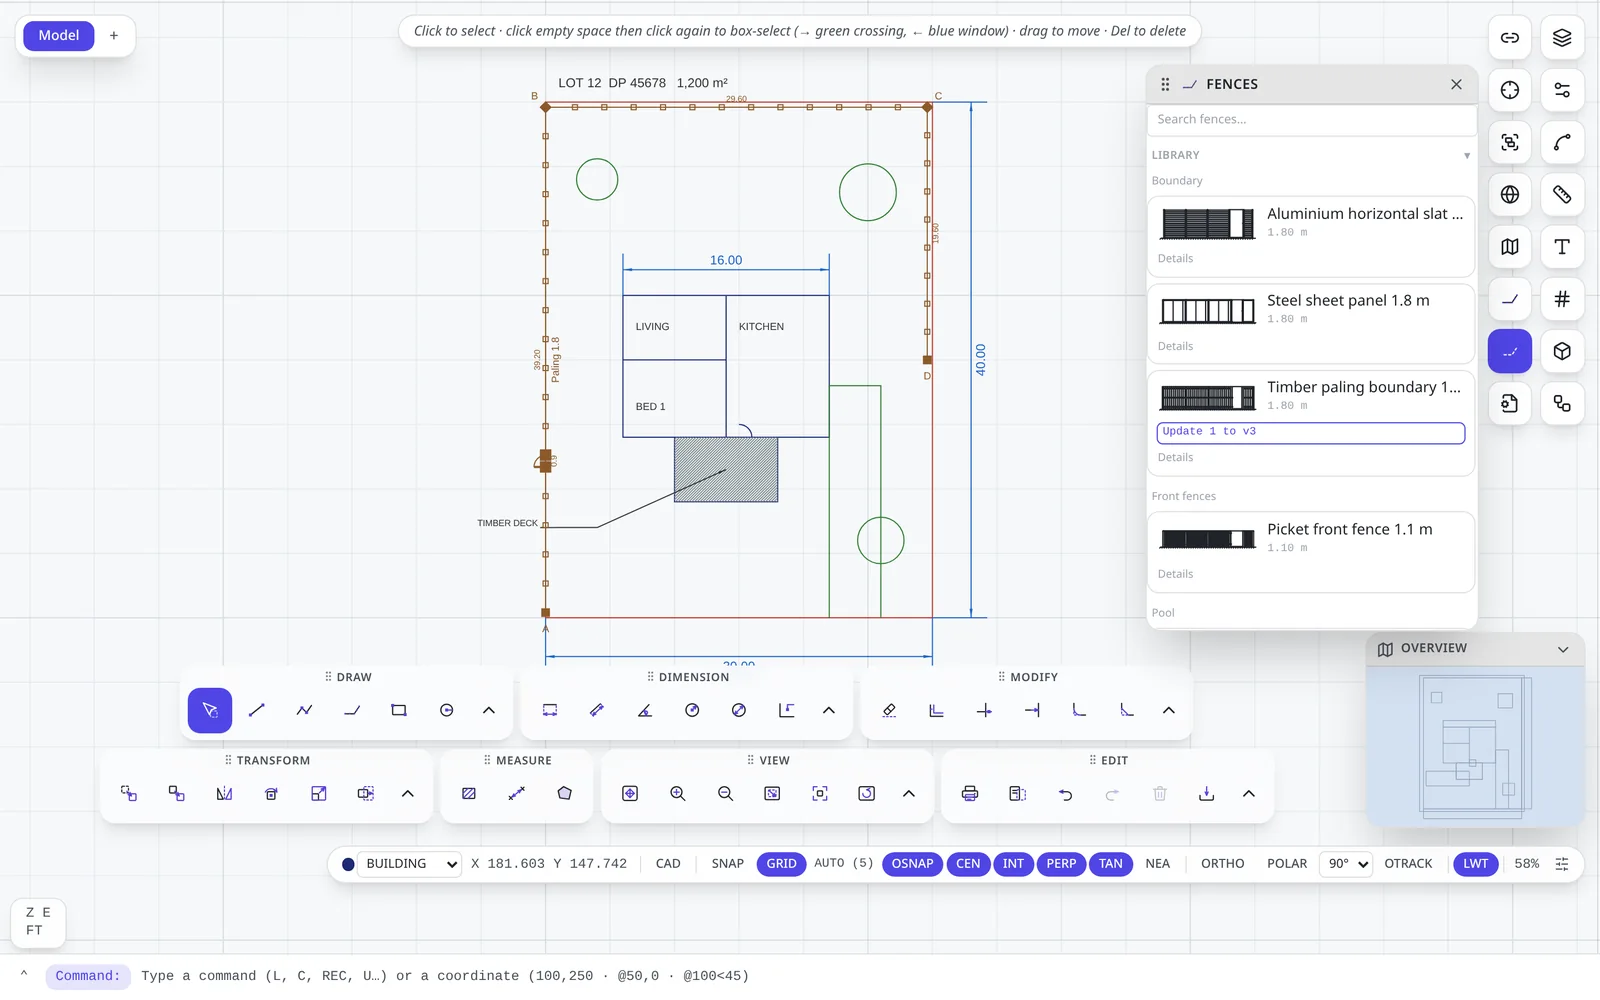
Type FT (FENCETYPE) to open the Fences panel. Fence types are grouped — Boundary, Front fences, Pool, Rural — each with a thumbnail and height, for example Timber paling boundary 1.8 m, Picket front fence 1.1 m, Pool barrier 1.2 m, Steel sheet panel 1.8 m, Aluminium horizontal slat and Rural post and wire. Search the library from the box at the top; Details shows the specification.
When a newer version of a type is available, an Update button appears on its card.
Drawing a fence
- Click a fence type in the library to arm it (or drag its card onto a boundary or parcel to fence it in one go).
- Type
FN(FENCE) and click the corners of the fence, just like a polyline.Ccloses it into a loop; Enter finishes an open run. - Add gates: type
GATEand click on the fence where the gate goes. Set the gate kind (pedestrian or driveway), width, number of leaves, hinge side and swing in Properties. - To change the type of existing fences, select them and type
FENCEAPPLY, or pick another Type in Properties.
In plan, a fence shows its posts (end, corner, line and gate posts), corner letters (A, B, C…), the length of each side and a type tag such as Paling 1.8.
Elevations, designer and takeoff
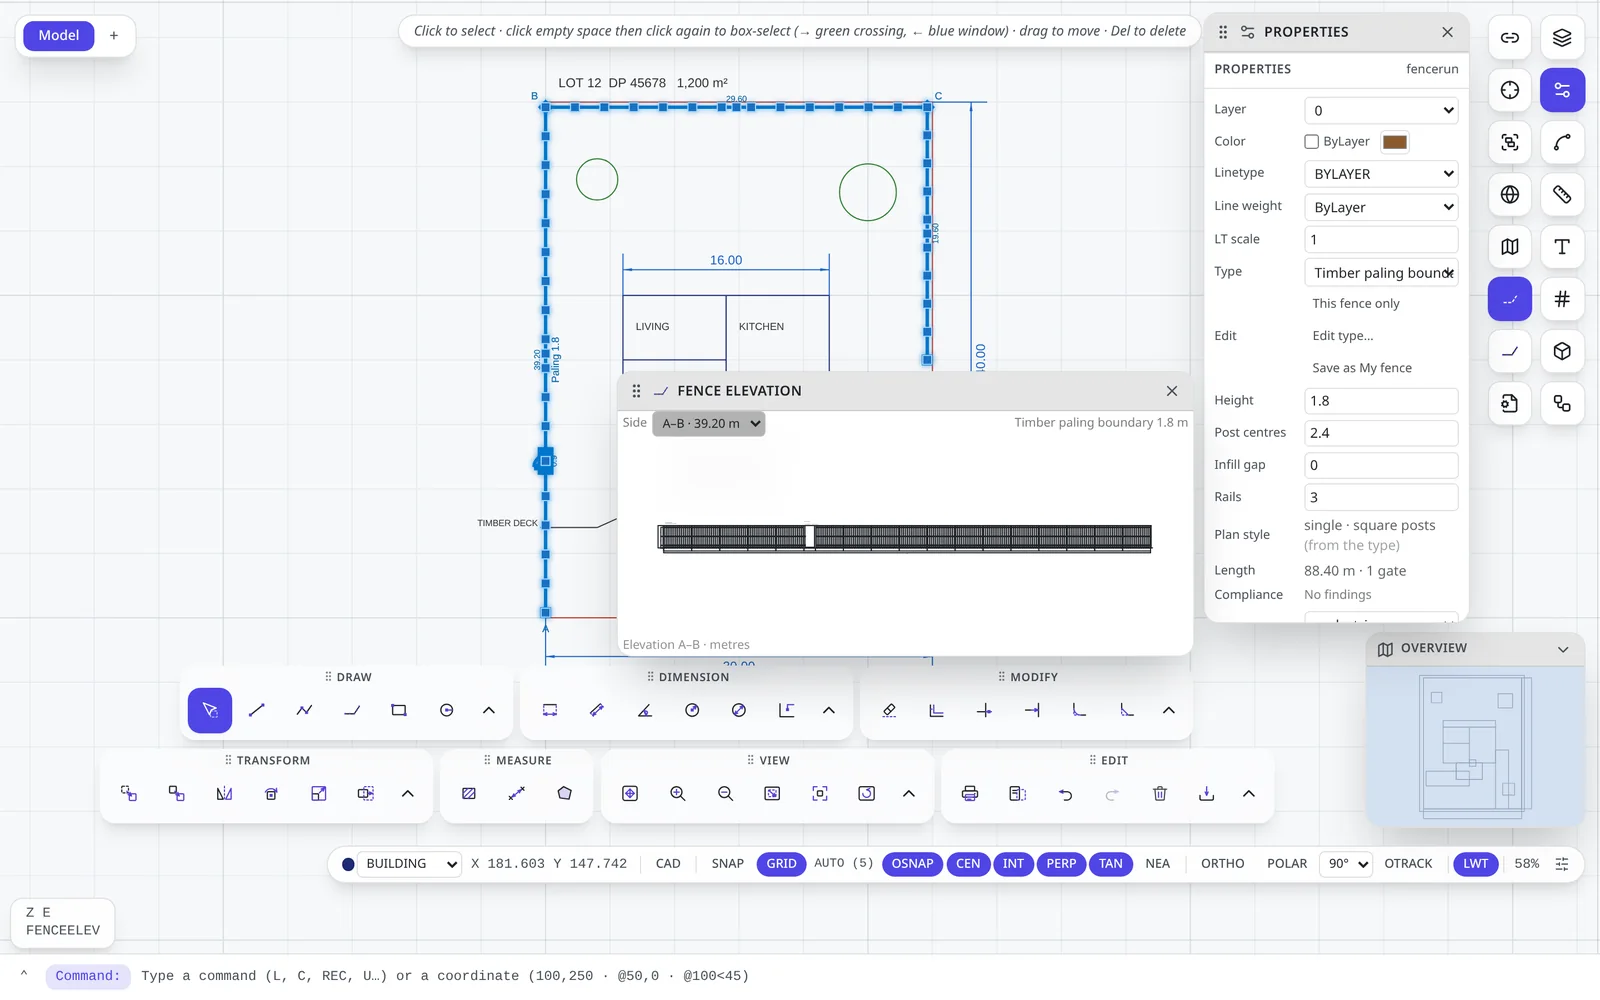
- Elevation — select a fence and type
FEL(FENCEELEV). Choose a side from the Side list to see posts, rails, palings, gates and dimension chains drawn to scale. - Per-fence adjustments — change height, post centres, infill gap and number of rails for this fence only in Properties, or choose Edit type… / Save as My fence to create your own reusable type.
- Fence designer —
FENCEDESIGNopens the designer for building a fence type from scratch. - Compliance — rules such as pool-barrier requirements are checked as you draw; findings appear in Properties.
- Bill of materials — the Fences panel's BOM produces the quantities of posts, rails, palings, gates and hardware for the selected fences, ready to price.
Interoperability
Chapter 19: Importing & exporting files
| Task | Command | Notes |
|---|---|---|
| Open a DXF or DWG | IMPORT, OPEN | Brings the file's layers, blocks, text and dimensions into the current model. |
| Overlay a DXF/DWG | XATTACH | As a locked underlay (Chapter 14). |
| Export DXF | EXPORT, DXFOUT, SAVEAS | A standards-conformant DXF that opens in AutoCAD and other CAD programs. |
| Export DXF in grid coordinates | DXFOUT GRID | Coordinates translated to the drawing's CRS, for GIS use. |
| Import survey points | CSVIN | CSV point schedules. |
| Import GIS features | GEOJSONIN | GeoJSON points, lines and polygons. |
| Attach an image | IMAGE | PNG / JPEG raster. |
PLOT | Vector PDF of the model or a sheet (Chapter 16). |
Z E to frame everything, then LA to review the layers that came in. Large DWG files can take a few seconds to read.Teamwork
Chapter 20: Sharing, collaboration & history
Sharing a drawing
- Click Share in the top bar. The Share this drawing dialog opens.
- Choose the link permission: Can view, Can comment or Can edit (edit links need a paid plan).
- Click Create link and Copy it — or type a Recipient email and click Send.
People with a view or comment link need no account. People with an edit link sign in (or create a free account) and then edit alongside you. The dialog lists every link with its status (Active, Revoked, Expired) and open count; Revoke stops a link at once. Every shared link supports up to 20 people at the same time.
Editing together
- Everyone on the drawing appears as an avatar in the top bar, with a colour dot for Editor or Viewer, and a count such as 3 here.
- Click someone's avatar to Follow them — your view tracks theirs. Click again to stop following.
- Changes appear for everyone instantly. If someone edits an object you have selected, it flashes so you notice.
- Each person's undo affects only their own changes.
Comments
Click Comments in the toolbar. Click + Add, click the spot on the drawing, type your comment and click Comment. Comments can be replied to, edited, Resolved and Reopened; filter the list by Open, Resolved or All, and click a comment to jump to its place in the drawing.
Version history and branches
Click History in the top bar.
| To… | Do this |
|---|---|
| Mark a milestone | Type a name in Version name (e.g. Rev C) and click Save. Named versions are tagged named in the timeline. |
| See what changed | Click Compare with previous on a row, or tick two rows and click Compare. |
| Go back | Click Restore on a version and confirm. Restoring creates a new version — nothing is lost. |
| Try an alternative | Click + New branch from current, name it (e.g. Option B) and click Fork. Use Switch to move between branches. |
| Bring a branch back | Click Merge on the branch, review any Conflicts and click Apply merge. |
| Recover recent work | Open Auto-saves (recovery) and click Restore on an entry. |
The Branch tree shows the history visually — click two nodes to compare them. Owners also see an Activity tab with an audit trail of who did what.
Personalising
Chapter 21: Settings & plans
Settings
| Section | Options |
|---|---|
| Appearance | Theme (Light, Dark, System, Custom), background, text colour, accent colour, font and interface size. |
| Editor defaults | Units (mm, cm, m, in, ft), show grid, object snap, autosave cadence (1–30 s), toolbar layout reset. |
| Team | For team accounts: add members and set roles — Owner, Admin, Editor, Viewer. |
| Billing | Your plan, invoices and payment details through the secure billing portal. |
| Account | Name, e-mail and verification, linked Google account, change password. |
Plans
| Plan | Best for |
|---|---|
| Free | Learning and personal projects: view and comment links, a basic "what changed" comparison and 30 days of history. |
| Pro | Professionals: edit links, full version history, branching and the advanced visual comparison. |
| Team | Firms: shared workspace, member roles and everything in Pro. |
| Enterprise | Custom requirements — contact sales. |
See the Plans page for current prices; annual billing is discounted.
Reference
Chapter 22: Keyboard shortcuts
| Keys | Action |
|---|---|
| Enter | Run / finish; repeat last command |
| Esc | Cancel command, clear selection |
| Ctrl+Z | Undo |
| Ctrl+Y · Ctrl+Shift+Z | Redo |
| Ctrl+A | Select all |
| Ctrl+D · Ctrl+Shift+A | Deselect all |
| Ctrl+C / Ctrl+V | Copy / paste |
| Del · Backspace | Erase selection |
| + / − | Zoom in / out |
| Arrow keys | Pan |
| Space + drag | Pan |
| Keys | Action |
|---|---|
| F7 | Grid display |
| F8 | Ortho |
| F9 | Grid snap |
| F10 | Polar tracking |
| F11 | Object-snap tracking |
| Single-key tools (when the canvas has focus) | |
| S · L · R | Select · Line · Rectangle |
| C · A · E | Circle · Arc · Ellipse |
| T · D · G | Text · Linear dim · Aligned dim |
| P | Pan |
Help
Chapter 23: Troubleshooting & FAQ
I typed a command and something else happened.
While a command is running, its option letters belong to it — e.g. C means Close inside LINE, not CIRCLE. Press Esc first to end the current command, then type the new one.
My clicks don't land where I expect.
Check the status bar: SNAP (grid snap) or ORTHO may be on, or an object snap may be catching a nearby point — watch the snap marker and tooltip before you click.
I can't select an object.
Its layer may be locked or frozen. Open LA and check the padlock and sun icons. Imported XREFs are locked by design.
I can't see my drawing.
Type Z E. If nothing appears, the layers may be off — open LA. If you used LAYISO, type LAYUNISO.
The dashes of a dashed line don't show.
Adjust LTSCALE — at large drawing sizes the dashes can be too small (or too large) to see.
My dimension text is tiny on the plot.
Increase the Text scale of the dimension style to suit your plot scale (Chapter 12).
Grid coordinates (G…) are rejected.
The drawing needs a georeference first — type GEOREF.
Map imagery or parcels don't load.
These need an internet connection and are available in New Zealand, New South Wales and Queensland. The drawing keeps working without them.
I went offline.
Keep working. The status shows Offline · saved on this device and everything is sent once you reconnect.
I made a mistake an hour ago.
Open History and Restore an earlier version, or use Auto-saves (recovery). Restoring never deletes the newer work — it becomes part of the history.